Testing code – A Good Practice to Have

Testing my code was drilled into my brain when I was working at edX. For each monitoring script I wrote, there was an accompanying test script to make sure that it worked. Prior to edX, I admittedly did not write tests for my code to make sure it worked. I just relied on good ol’ pencil and paper, have a list of what I wanted to check, and manually test code for outcomes.

So write code, have some test inputs, run the code, check for errors and outcomes. Wash, rinse, repeat.

Admittedly, the above wasn’t efficient, but it’s what I knew. In Flatiron School, we touched upon writing tests for our code. Even our practice assignments had tests to along with them. Shameless green! But given the time and learning curve, it was something I put on the back burner. And then work happened and then things changed.

The value of testing code and TDD

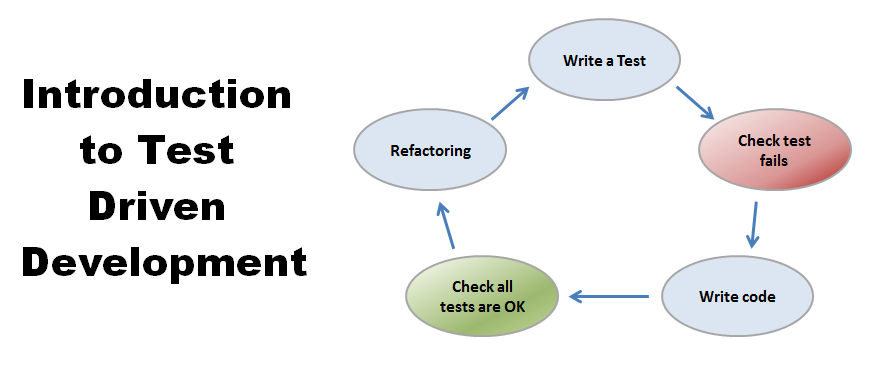
For most of us software developers starting out, writing code and testing it afterward was the natural thing to do. TDD, or test-driven development flips that in order. For TDD, according to GeeksforGeeks, test cases are written before the code that validates those cases.

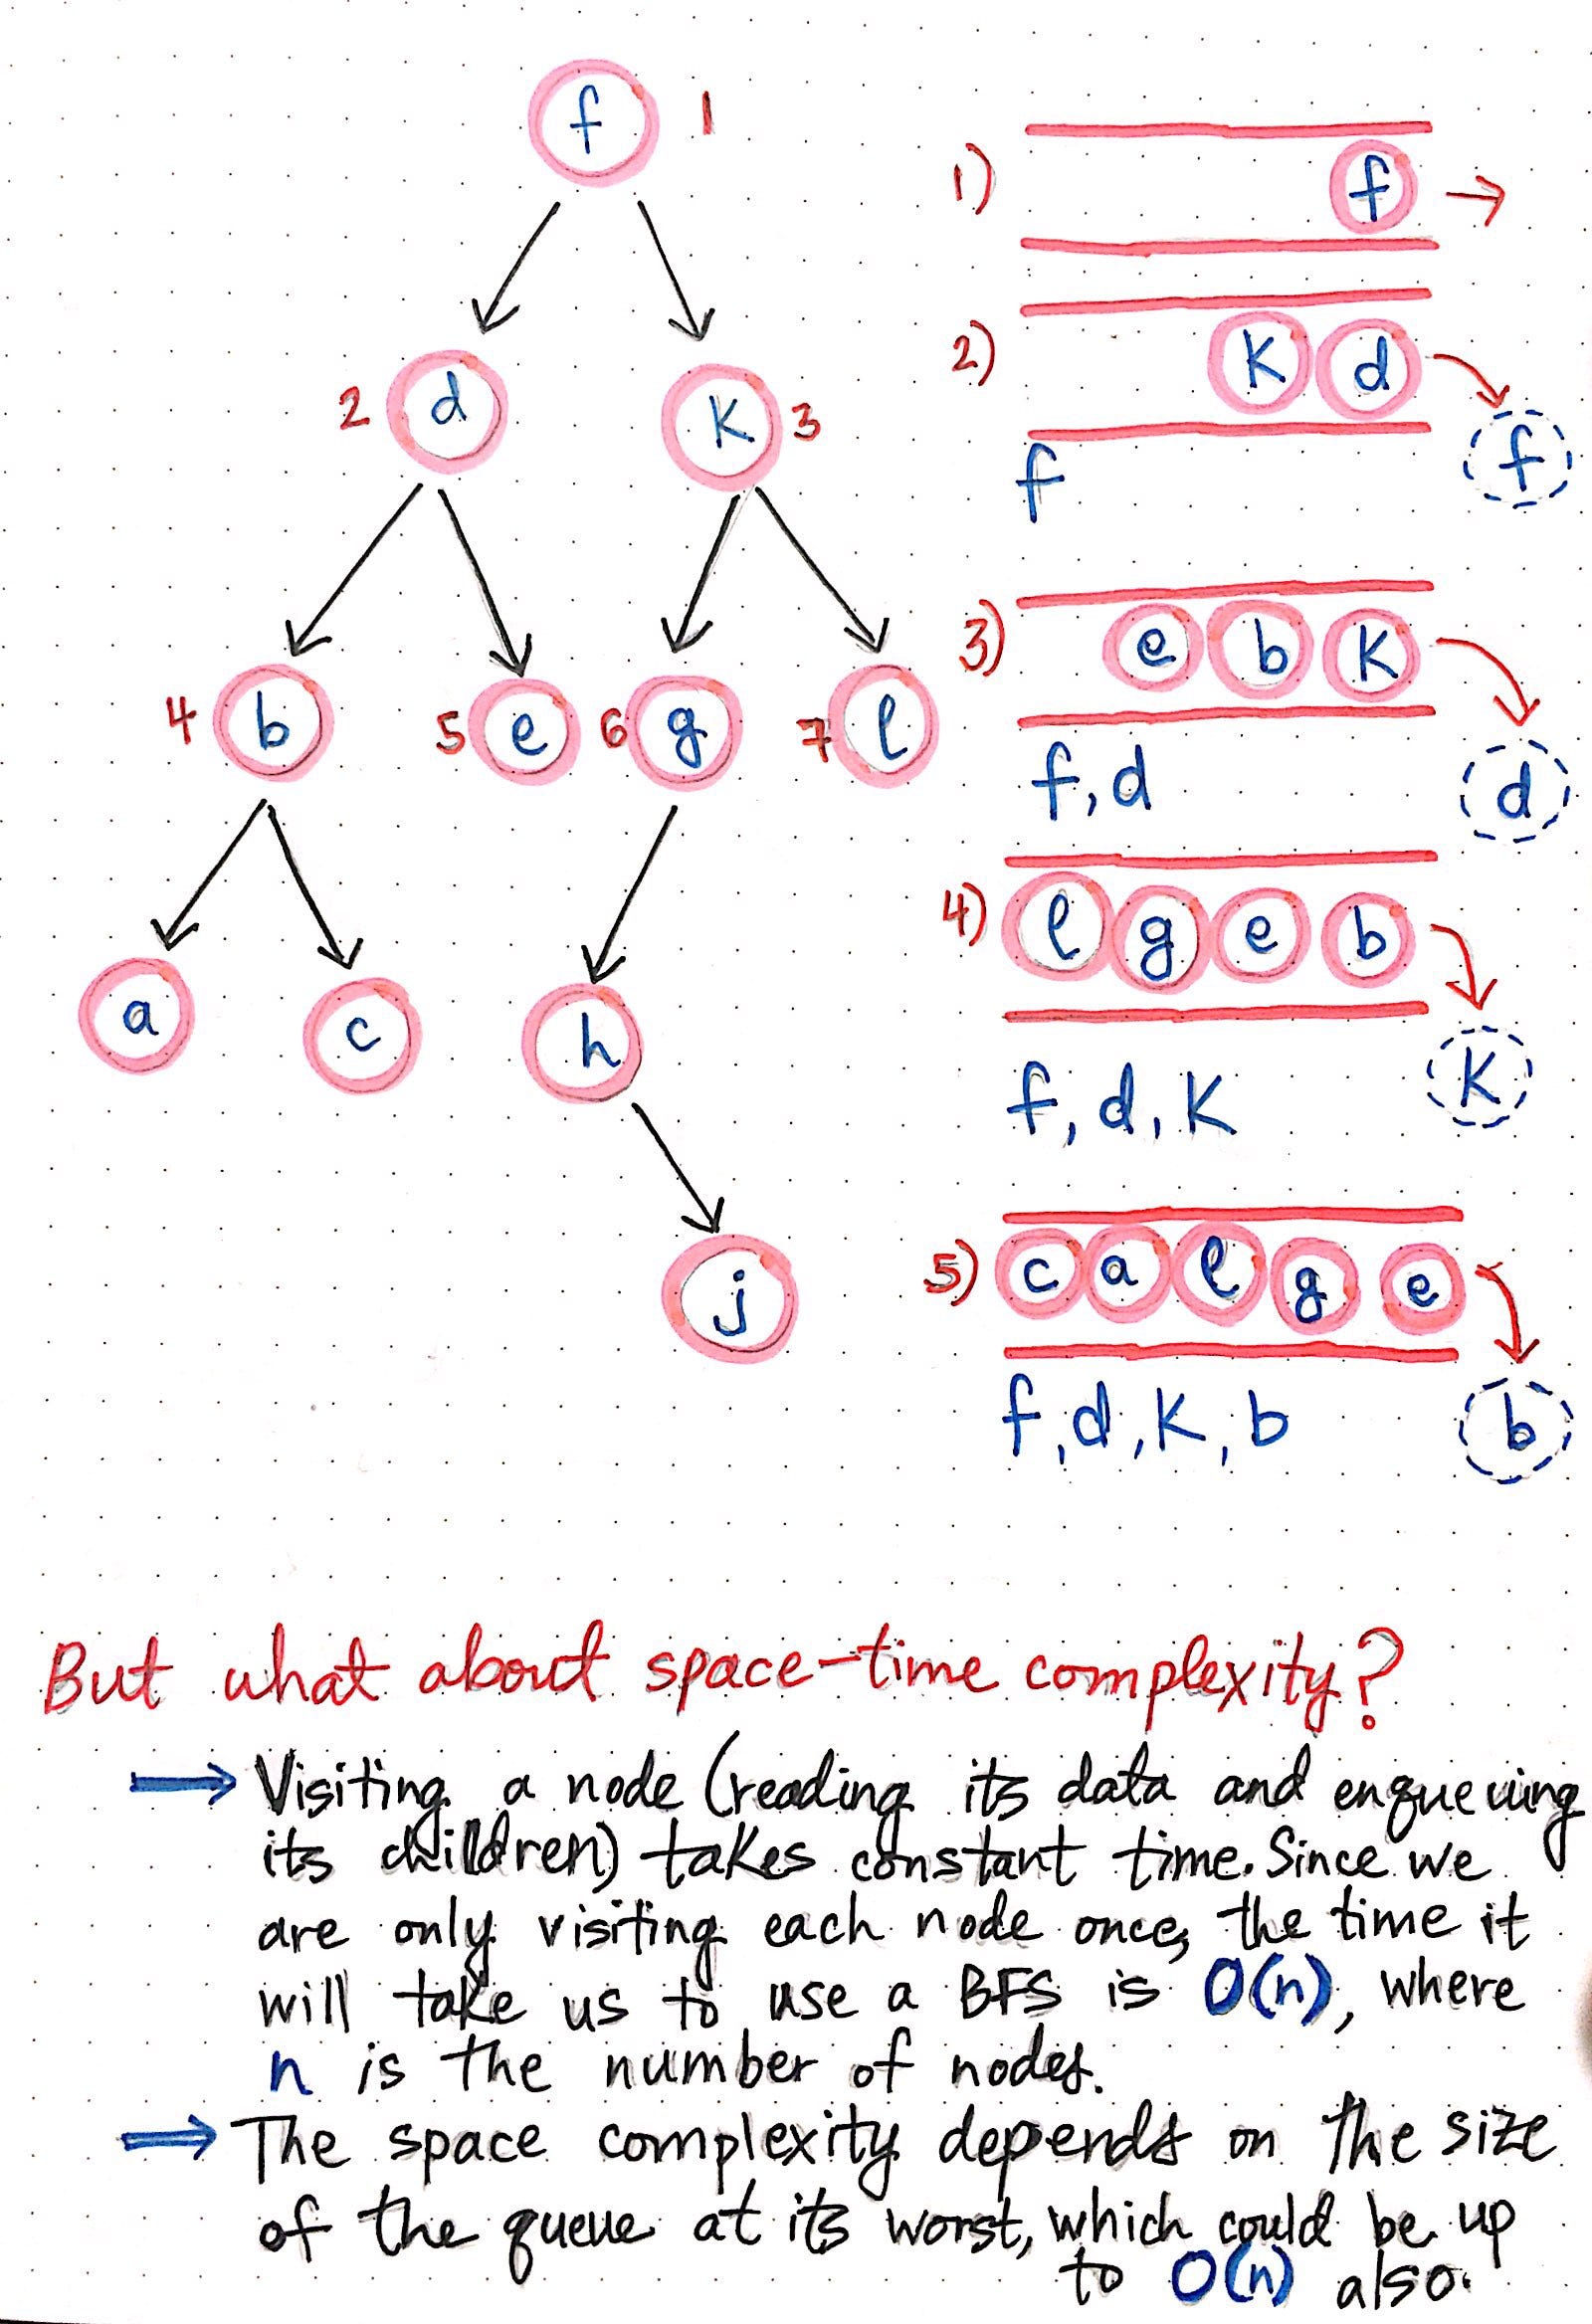
The following sequence of steps is generally followed:

1. Add a test – Write a test case that describe the function completely. In order to make the test cases the developer must understand the features and requirements using user stories and use cases.

2. Run all the test cases and make sure that the new test case fails.

3. Write the code that passes the test case

4. Run the test cases

5. Refactor code – This is done to remove duplication of code.

6. Repeat the above mentioned steps again and again

Hackernoon provides this graphic:

Image for post

But why is this important?

While TDD isn’t a miracle pill that solves all your code error problems, assuming that you adopt the practice, it does force a change in approach on how to write your code. For me, it forced me to write my code into smaller chunks and identify dependencies within my code. In addition, it forced me to clearly identify what these chunks of code are supposed to do before writing them. If I know beforehand my inputs and assumed outputs, that’ll keep me on track when designing and writing my code for its overall purpose.

On another note, once I’m done with my designing my tests and satisfied with what it does, I’m not as worried about the functionality of my code when I do refactor it, since feedback is pretty clear and quick.

Frameworks of choice

Testing frameworks are more prevalent these days for popular languages. For instance, JavaScript has Jest and Mocha, just to name a few. Ruby has rpsec. Python has it’s own as well, like PyTest, as well as its own built in library, unit test. Since my project runs on Python, we’ll dwelve into more of those.

Testing CovidBikeData scripts with Pytest and unit test

CovidBikeData, my current side project as I look for work, so far has a scraper to pull data and another script to plot some data. Let’s take a look at the scraper code.

"""Downloads Citibike trip data as zip files then unzips them.
Downloads NY trip data for January 2020 to previous published month
"""
import os
import zipfile
import json
import datetime
import calendar
import requests
def get_previous_month_with_year():
"""Checks for current month and returns the last month,
since Citibike publishes data of a given month a month later
ex. Data for January is published February
Returns:
tuple: Tuple of previous month and its associated year
"""
now = datetime.datetime.now()
past_month = now.month – 1 if now.month != 1 else 12
year = now.year if past_month != 12 else now.year – 1
return (past_month, year)
def get_trip_data(json_file_path):
"""Takes in a file path (expected to be json) that contains
information that corresponds to each monthlike URLs to files and file paths
Args:
json_file_path (string): string of filepath
Returns:
dict: dictionary of loaded data from JSON
"""
try:
with open(json_file_path) as json_file:
trip_data = json.load(json_file)
except IOError:
print('Could not read file')
return trip_data
def retrieve_citibike_data():
"""Retrieves trip data from Citibike's S3 buckets as zip files.
Checks against trip_data json to see if anything new, and downloads it, add's it to repo
Returns:
Nothing
"""
# open JSON_file
json_file_path = './tripdata/trip_data.json'
trip_data = get_trip_data(json_file_path)
target = './tripdata/zip/citibike_tripdata_'
# get current date to attempt get last months data
# since data lags a month ie in October, expect a September data dump
# make special case when current month is January
past_month_with_year = get_previous_month_with_year()
for month in range(1, 13):
if month > past_month_with_year[0]:
break
date_format = str(past_month_with_year[1]) + '{:02d}'.format(month)
if date_format not in trip_data:
url = 'https://s3.amazonaws.com/tripdata/' + date_format + '-citibike-tripdata.csv.zip'
# make request first. If 404, break loop, otherwise, continue with data download
response = requests.get(url)
if response.status_code == 404:
print('404 status was issued.')
print(f'Data for {calendar.month_name[past_month_with_year[0]]} not ready yet')
break
file_path = target + date_format + ".csv.zip"
past_month_trip_json = {
'url': url,
'file_path': file_path
}
trip_data[date_format] = past_month_trip_json
with open(file_path, 'wb') as opened_file:
opened_file.write(response.content)
print(str(past_month_with_year[1]) + "-" + str(month) + " done")
print("Overwriting %s" % json_file_path)
with open(json_file_path, "wt") as overwritten_file:
json.dump(trip_data, overwritten_file, indent=4)
def unzip_citibike_data(zip_dir, csv_dir):
"""Unzips Citibike zip files for NY.
Returns:
Nothing
"""
extension = ".zip"
# for each zip file in zip_dir extract data to csv_dir
for item in os.listdir(zip_dir):
if item.endswith(extension):
# create zipfile object and extract
file_name = zip_dir + item
print(file_name)
with zipfile.ZipFile(file_name, "r") as zip_ref:
zip_ref.extractall(csv_dir)
print(item + " done")
os.remove(file_name)
if __name__ == "__main__":
retrieve_citibike_data()
unzip_citibike_data("./tripdata/zip/", "./tripdata/csv/")
view raw scraper_app.py hosted with ❤ by GitHub

Along with the test script that accompanies it

"""Test suite for app.py
"""
import unittest
import datetime
import os
from unittest import mock
from scraper import app
class TestApp(unittest.TestCase):
"""Class for testing suit for app.py
"""
@mock.patch('datetime.datetime')
def test_get_previous_month_with_year(self, mock_date):
"""Test for get_previous_month_with_year
Since Citibike publishes data for a given month the following month, check that previous
month is returned
Args:
mock_date (mock): mock object from the patch decorator that replaces datetime.datetime
within get_previous_month_with_year
"""
mock_date.now.return_value = datetime.date(2020, 11, 20)
test_date = app.get_previous_month_with_year()
self.assertEqual(test_date[0], 10)
self.assertEqual(test_date[1], 2020)
@mock.patch('datetime.datetime')
def test_get_previous_month_when_january(self, mock_date):
"""Test for get_previous_month_with year, specially to test for January
Since Citibike publishes data for a given month the following month, then for the month
of January, it should be December of the previous year
Args:
mock_date (mock): mock object from the patch decorator that replaces datetime.datetime
within get_previous_month_with_year
"""
#set up mock datetime
mock_date.now.return_value = datetime.date(2021, 1, 20)
test_date = app.get_previous_month_with_year()
self.assertEqual(test_date[0], 12)
self.assertEqual(test_date[1], 2020)
def test_get_trip_data(self):
"""Test for get_trip_data, which opens JSON file
"""
test_path = "./test/test_json.json"
test_results = app.get_trip_data(test_path)
self.assertEqual(len(test_results),3)
def test_unzip_data(self):
"""Test for unziping method.
Checks to see if unzipping is successful in given file path
"""
zip_dir = "./test/testfiles/zip/"
fake_csv_dir = "./test/testfiles/text/"
patcher = mock.patch('os.remove')
patcher.start()
app.unzip_citibike_data(zip_dir, fake_csv_dir)
self.assertEqual(len(os.listdir(fake_csv_dir)), 4)
patcher.stop()
os.remove(f'{fake_csv_dir}test_txt4.txt')
if __name__ == "__main__":
unittest.main()

Breaking down the test script

If you recall, the scrapper attempts to pull data from an s3 bucket hosted by Citibike. The data of a given month gets published a month afterward, so that was a clue for me to write a test to account for that. When designing the code to check to see if there’s a new batch of data published (because we’ll never know when Citibike decides to publish data), I opted to save what data was already published into JSON (so the script knows not to redownload data), so I had to do some reading and writing. That was a clue for another dependency, hence a potential test case. Finally, if we downloaded the zip file, we’d have to unzip it, so a third test case.

For all three, I tried to identify what I wanted to test, so you’ll see in the second gist things like checking for the previous month and year, checking for a successful opening of a JSON file, or a successful unzipping of files.

Lines 3 -7 show my imports. I decided to use unit test, since that’s what I was familiar with. I also needed the datetime and os modules, since that was integral to my code. You’ll notice in line 6 a mock package, which I’ll explain in another post, and finally, the code that I’m testing, which I called app.

import unittest
import datetime
import os
from unittest import mock
from scraper import app

Let’s look at my first test.

    @mock.patch('datetime.datetime')
    def test_get_previous_month_with_year(self, mock_date):
        """Test for get_previous_month_with_year
        Since Citibike publishes data for a given month the following month, check that previous
        month is returned
        Args:
            mock_date (mock): mock object from the patch decorator that replaces datetime.datetime
            within get_previous_month_with_year
        """
        mock_date.now.return_value = datetime.date(2020, 11, 20)

        test_date = app.get_previous_month_with_year()

        self.assertEqual(test_date[0], 10)
        self.assertEqual(test_date[1], 2020)

I’ll get more in-depth with mocking in an upcoming post, but what the “mock_date.now.return_value” line is doing is replacing the datetime.now in my original function “get_previous_month_with_year()” with a date of 11/20/2020.

Knowing that Citibike publishes data of a given month later, I would check the date of “now”, and then return the previous month and year in a tuple. So if a forced an input of 11/20/2020, I should get an output tuple of (10, 2020).

Those “self.assertEqual” lines then check the values within the tuple.

Since I was going with a TDD approach, the test dictated how the code would be designed, ultimately it became what you see below.

def get_previous_month_with_year():
    """Checks for current month and returns the last month,
    since Citibike publishes data of a given month a month later
    ex. Data for January is published February
    Returns:
        tuple: Tuple of previous month and its associated year
    """

    now = datetime.datetime.now()
    past_month = now.month - 1 if now.month != 1 else 12
    year = now.year if past_month != 12 else now.year - 1
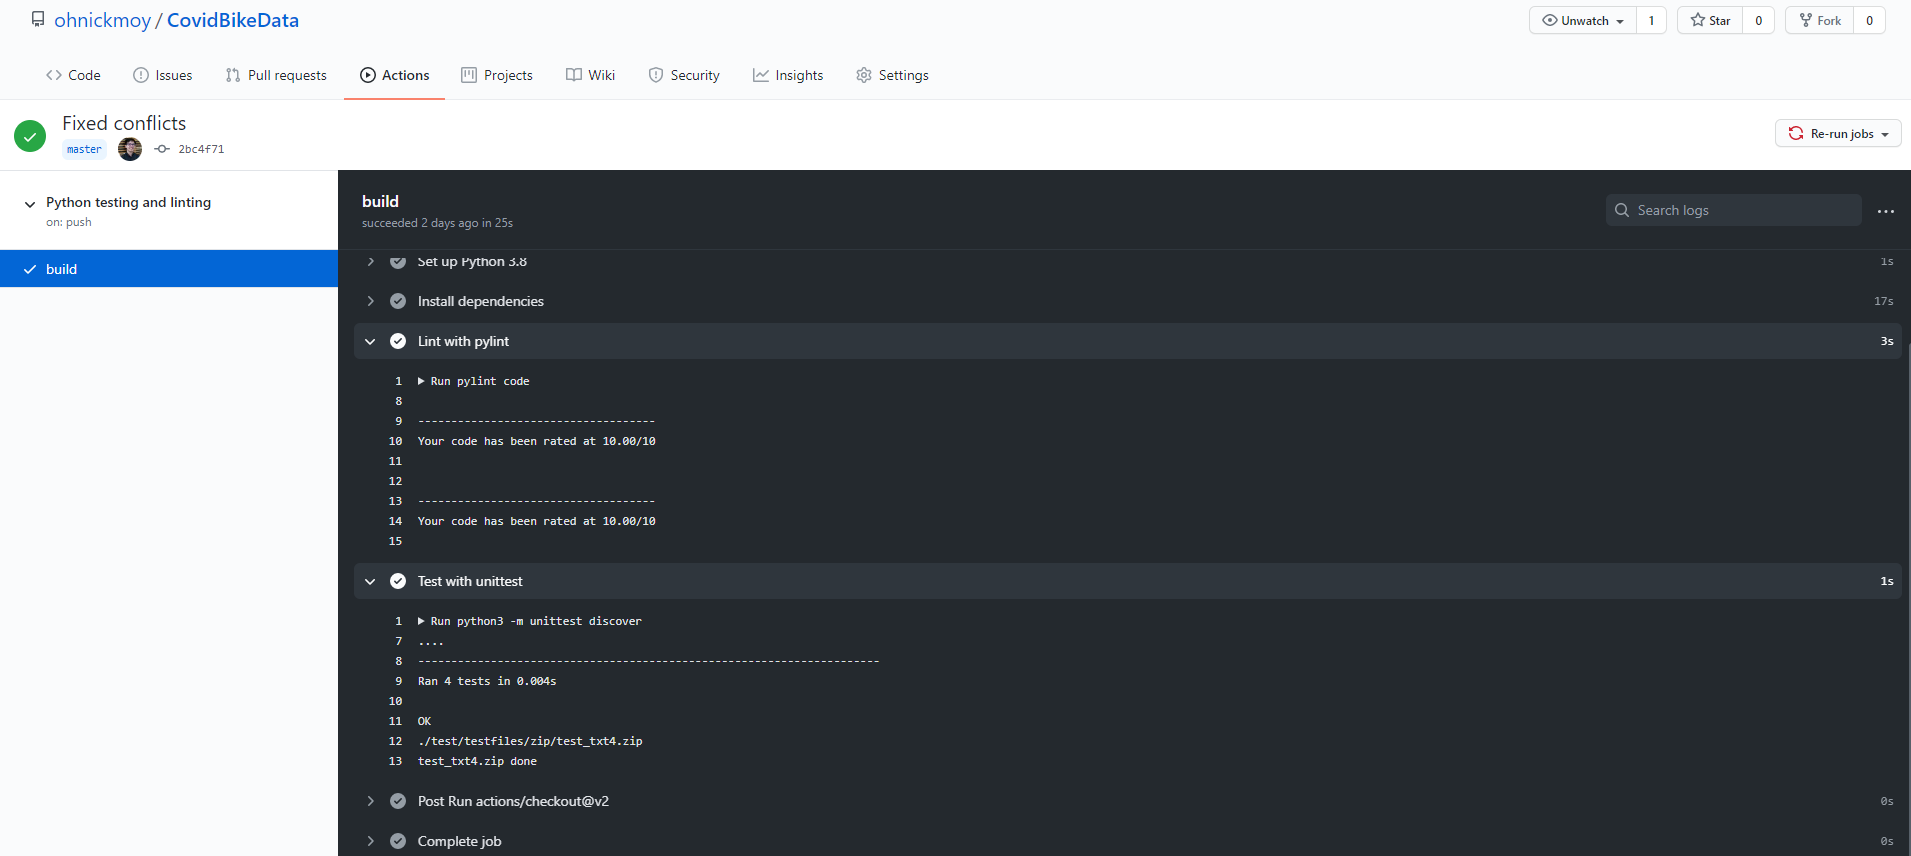
    return (past_month, year)

I took this approach with the other tests as well. Write a test, and then write a function to account for it. Let’s say I wrote four all tests, and then execute them. Successful tests would look something like below. For each test would be a dot.

....
----------------------------------------------------------------------
Ran 4 tests in 0.004s

OK

Let’s say you failed a test, a dot would instead be a big “F”.

When do these tests get executed?

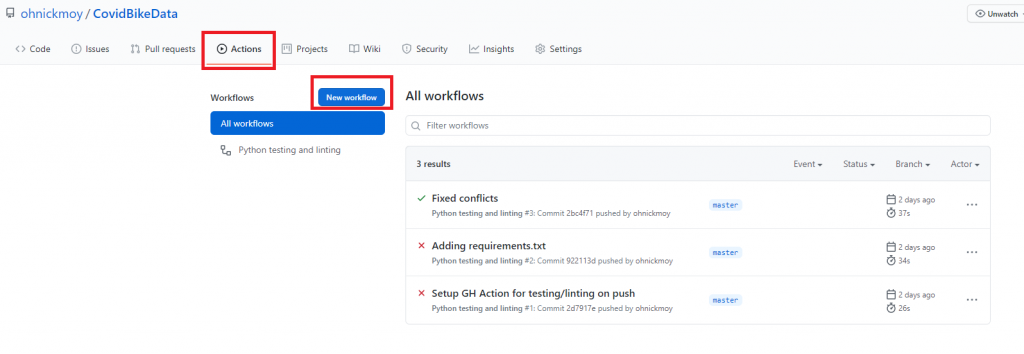
Let’s say you’re the new owner of this code and need to refactor it for some reason, but want to keep the same expected outcomes. These tests, assuming that the previous owner wrote them already, would help you make sure those expected outcomes are still maintained, despite code changes. But how are they executed without you, the new owner, running the pytest command over and over again? That’s where the workflows from GitHub actions come in.

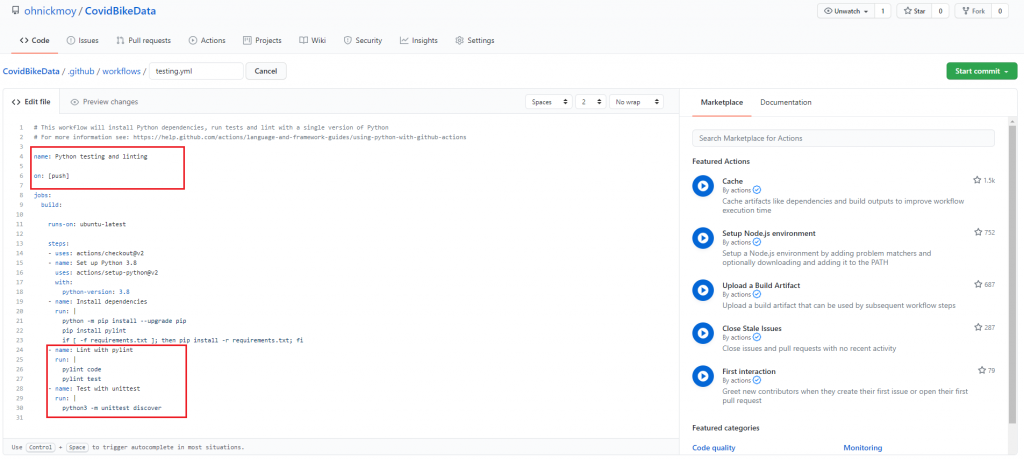
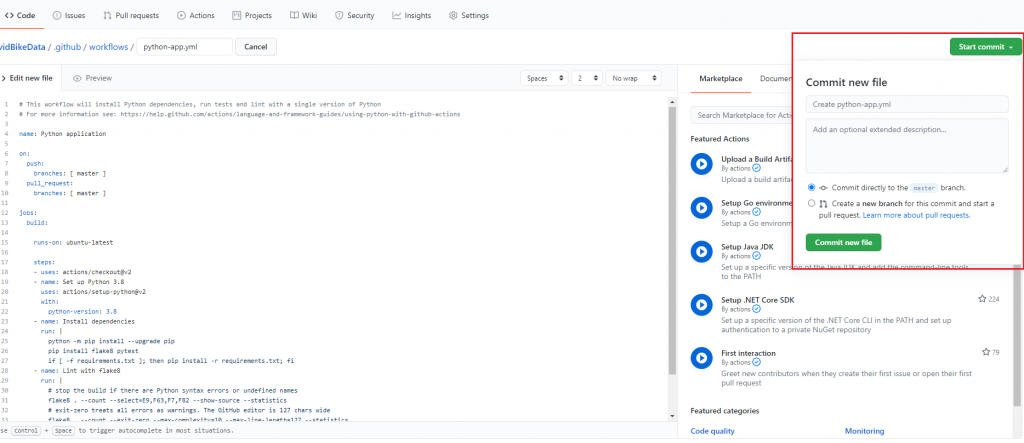
Here’s what it looks like, as a refresher:

name: Python testing and linting

on: [push]

jobs:
  build:

    runs-on: ubuntu-latest

    steps:
    - uses: actions/checkout@v2
    - name: Set up Python 3.8
      uses: actions/setup-python@v2
      with:
        python-version: 3.8
    - name: Install dependencies
      run: |
        python -m pip install --upgrade pip
        pip install pylint pytest
        if [ -f requirements.txt ]; then pip install -r requirements.txt; fi
    - name: Lint with pylint
      run: |
        pylint scraper
        pylint plotdata
        pylint test
    - name: Test with pytest
      run: |
        pytest

Aaaaaaall the way on the bottom is the command to run pytest. This action tells Github to, among other things, run pytest every time new code is pushed onto a branch. Get the tests to past, you get a green check mark, but if it the tests fail, you get a big red x.

The workflows help in some of the automation of testing and getting new code into the code base while preventing faulty builds. A set it and forget it type of thing.
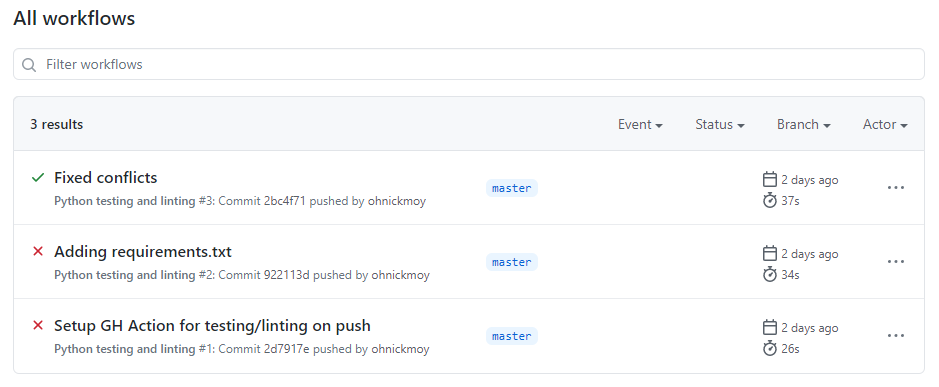
Here’s an example:

BIG RED X

At this point, I was switching over from unit test to pytest, mostly cause a friend of mine said pytest gave you pretty colors. BUT, there are better reasons for using pytest of over unit test and that’s mostly because pytest doesn’t need as much boilerplate code to set up as unit test does. Thankfully, pytest can run unit tests even when old tests are set up to run with unit test. Big win!

Conclusion

That was a brief intro to TDD, some of the python testing frameworks, and how I’m implementing it into my project. Hope it was helpful! Check out the sources and citations of this blog post for more info.

Sources

CovidBikeData – Applying the lessons learned from edX and then some (an ongoing story)

A lot has happened in my personal life since my last post, which explains the dormancy of my site, but I’m now starting to get back in the saddle and work on some interesting stuff.

Storytime

After getting settled in my new apartment after my stint at edX, I was mulling over new project ideas, with a focus on wanting to apply some of the practices learned at edX and continue to build on my career as a software developer. What were some of the goals?

  • Learn Github Actions (after being exposed to Travis CI)
  • Build a CI/CD pipeline and figure out how to automate testing/deployment (after being exposed to GoCD and ArgoCD)
  • Have some static site to show for it (like utilizing Hugo to publish something to Netlify)

After conversations with friends and old coworkers, I decided to do something interesting by doing simple data analysis with bike-sharing data during the Covid-19 period and pushing some visuals to a static site. Who doesn’t like infographics and weird stats?

Also, for me, this project is a good opportunity to talk about a lot of software development sub-topics and what I’m learning along the way, such as the value of testing and linting code, how to do it, or the challenges I’m facing that’s having me pivot or adjust.

A little bit about the project

What problem(s) does it aim to solve?

In conversations with my old coworker that gave me the idea, one challenge in doing analysis with a data set that has more or less an unpredictable endpoint is the acquisition of data. It’s a pretty manual endeavor.

  1. Check this s3 bucket to see if new data has been published.
  2. Click the link to get the zip file.
  3. Unpack it. Add it to your data set. Do a new analysis.

So why not automate that? Hence running a script that does all of that through a GitHub action and then publishing something interesting.

Yeah that’ll definitely do it.

Progress so far and some cool things

You can check out the repository here to see what I’ve been up to. Some notable things that have been accomplished include the pulling of the data during the Covid-19 period and doing testing on code that has been pushed to a repository regardless of branch. Let’s talk about testing and the GH Action associated with it briefly.

Testing with Github Actions

You’ve probably done it all before. To test your code to see if a given function works, you probably did some manual testing. Say for instance you had some function that did the addition of two numbers. You wanted to get a sum of 5, so you might have gone into a ruby or python console, fed it purposefully the numbers 2 and 3, and got what you wanted.

For the next step up, let’s say you wrote a script that ran a set of tests and used something like rspec (for ruby) or unittest or PyTest (for python). You’d still have to manually execute the script every time you updated your code or testing scripts.

Github actions take that manual process and automates it, but it’s definitely not limited to just testing.

To set it up, you can do the following.

  1. When you’re in your repo, you can click on actions and then on new workflow.

2. For the purposes of testing (and assuming you’re using python), click on Python application.

Actions are pretty customizable to your liking, but the pre-set ones are good for those that are just diving into this stuff.

3. Now you’re given a chance to write your workflow. This requires some knowledge of how YAML files are written and a good understanding of Github and it’s actions, so read the docs! What I ultimately ended up with is below. I outlined my changes in red.

The prebuilt workflow set testing for push on master only, but I opted for it to be on push for all branches. In addition, I opted to lint with pylint instead of flake8 (just a personal preference) and test with unittest (again, personal preference).

4. Next, click on the button that says, “Start Commit” give it a comment and some description if you want, select from the two options, and then commit the new file.

What results is a new folder in the repo that goes by the name of .github/workflows, assuming you didn’t change anything besides the filename.

What follows now is that because of the way the workflow YAML was configured, it’ll fire up every time a commit was pushed to a branch. You can see what actions were executed the next time you click on the “Actions” tab in the repo page. For example:

You might notice on your commits a green checkmark or a red x depending on whether your tests fail or pass.

If you’re curious about the details, you can click on the commit message, like “Fixed conflicts” for example, and it’ll take you to the job details. Then you can check the build status for details. For instance…

This demonstrates that the code commited based on the action has passed.

And there you have it! A brief primer into Github actions.

Potential hurdles and looking into the future

Hurdles

Looking at the data already, I noticed something. While the zip files containing the CSV’s were around 100 megs or under, the CSV’s themselves are around 200-400 MB a piece, meaning data storage, retrieval, and analysis will get hefty pretty quickly over time. Which takes me to the first hurdle that I’m trying to address: storage and cost.

As most of you probably know, nothing (or very few things) come free, and so storing these large files on cloud servers that belong to Amazon or Google and retrieving them on an automated schedule every month could get costly, so there’s some work arounds that I’m mulling over such as:

  1. Create AWS account with free tier and store it that way
  2. Store 2-3 months worth with Git LFS
  3. Store data with https://github.com/actions/upload-artifact

I haven’t decided yet, but it’s something I’ve been thinking about since it occurred to me how expensive this can get for an unemployed guy.

Things to look forward to

Among the things I’m forward to, it’s the data visualization and publishing it to site, which builds toward creating the CI/CD pipline that I mentioned earlier.

And there you have it! I’m back to blogging, and I hope you’ll follow me on this journey on working on some new stuff.

Peace!

Summer at edX

edX is a massive open online course (MOOC) provider based out of Boston, MA and it was the place of my internship for the summer as I start my career as a software engineer. I opted to be part of the Site Reliability Engineering team for the summer and suffice to say, I learned A LOT during my 3 months with them.

The interest in DevOps and SRE

Back when I was still at Flatiron School, I had a chit chat with one of my coaches about career aspirations. I mused that my time in the game industry and NYC DOE helped me appreciate QA and efficient organizational structure. If an organization can work out the kinks in their products or processes proactively, quickly and efficiently, it would ultimately lead to better user experiences and an overall good product. I noted that if I could somehow combine my coding skills with this interest in structure, that’d be something to look forward to. So my coach planted the seed in my mind to explore DevOps sometime in the future.

Fortunately, a few months later, the opportunity presented itself to do just that with an internship at edX. I had a choice between being a Front end developer or a site reliability engineer (SRE), so I figured, why not?

The google cloud blog has a nice post explaining the relationship between SRE and DevOps. As the post notes, “SRE prescribes how to succeed in various DevOps areas”.

My assignment for the Summer

My task for the summer was the instrumentation of GoCD, a continuous integration/deployment (CI/CD) service. That meant building out monitors of specific metrics from the GoCD server and alerting on them whenever certain thresholds were crossed.

Some of the major technologies used to achieve that over the summer included the following:

Most of the work involved writing python scripts that would be run as a Kubernetes CronJob, push the metrics collect to CloudWatch, and have alarms set up through Terraform. You can see some of the work below:

Agent Status metrics
Alarming on Job Queue’s through Terraform and CloudWatch

In addition to the work with these scripts, I also set up New Relic’s Containerized Private Minion to monitor server uptime.

Ping monitor through New Relics CPM

Takeaways

2020 has been a weird year, to say the least. I graduated from boot camp, still managed to find some work, learned how to work remotely, and find success in the work that I was doing. I didn’t know what to expect with work from home being the norm, but it’s not as bad as I thought it was. It just took some adjusting.

I’m really glad I got the exposure to some of the work that’s done on the operations side of things and hope to continue to build on that so that I can ultimately be a more well-rounded developer.

Discovering Data Structures – Binary Tree Traversal

Let’s find our way through the forest

In our last couple of posts, we talked about two things: the implementation of binary trees and recursion. First, we know that binary trees consist of a root node, that points to its own children, which then points to its own subsequent children. Second, we know that recursion is the process in which a function calls itself directly or indirectly. With these two big ideas in mind, we come to my last post about binary trees: traversal.

Common approaches to similar problems

There are a lot of coding problems that you may encounter that will have you traverse a tree to figure out a certain issue: searching an element within an unordered tree, finding the max height or depth of a tree, or making a deep copy of an object. The sky is the limit here, and likewise, there are tons of ways out in the wild to figure out these issues. Should we check the bottom nodes first? What order? Should we do it level by level?

What we’re going to do is focus on a few common approaches. We’ll talk about…

  • Breadth-first search
  • Depth-first search

Here’s an image from basecs (remember to cite your source) that breaks it down:

Thanks internet!

As the image above shows, DFS checks by subtrees. BFS checks by node level. For DFS in particular, we’ll go over PreOrder traversal, PostOrder traversal, and then inOrder traversal.

Breadth-first search traversal

Cause we’re getting lower and lower!

Breadth-first search, or BFS, is the traversal method where we want to look at every single sibling on a given level before we move down the next level. So if you took a look at the last picture, it’s looking at all the reds, then the greens, then the blues. It’s looking horizontally.

Pseudocode

  1. Create a queue (like an array)
  2. Place the root node in the queue
  3. Loop as long as there’s anything in the queue
    1. If there is a left child on the current node in the queue, add it to the queue
    2. If there is a right child on the current node, add it to the queue
    3. Remove the current node from the queue
  4. Return variable that stores the values.

Keep in mind this is a very basic implementation. Maybe you want to keep track of all the nodes that you visited already, which may mean you need another data structure to keep track of that instead of just throwing it out altogether.

Reasons for the queue

The reason why you need the queue is that since sibling nodes aren’t directly linked together, you need some sort of separate structure to keep track of all the nodes you visited already, hence the need for a queue.

Also remember, queues have that FIFO (first in, first out)characteristic, meaning the first element is always being shifted out after it’s visited, and subsequent child nodes will be pushed to the end of the line, eventually making its way to the front of the line so it’ll be checked. The drawing from the same blog post helps visualize what I’m talking about.

Implementation

function bfs(rootNode){
  //check to see if root node exists
  if(rootNode === null){
    return; 
  }

  //create queue, push root node into it 
  let queue = []
  queue.push(rootNode)
  
  //continue to traverse through queue as long as it's not empty
  while(queue.length > 0){
    //ref to current node, which is first element in queue
    let currentNode = queue[0]

    /*
      This may be a good spot to place some other implementation, like logging the value of a node to the console. It all really depends on the problem you're trying to solve
    */

    //if currentNode has left or right child nodes, add them to the queue
    if(currentNode.left !== null){
      queue.push(currentNode.left)
    }

    if(currentNode.right !== null){
      queue.push(currentNode.right)
    }

    //remove currentNode from queue
    queue.shift()
  }

}

Depth-first search traversal

“Wait a minute, I thought you said you were going to talk about recursion in this post.” Well, now that we moved passed BFS, we’re going to go into DFS, which definitely uses recursion.

Like in the image way earlier in this post describes, DFS traverses by going through the left subtrees first, and then the right subtrees, rather than like in BFS, go level by level. Like it’s namesake, we go depth-first, or vertically.

In this post, we’ll go through three variants:

  • PreOrder traversal
  • PostOrder traversal
  • InOrder traversal

Changing the order of the lines of codes within our DFS function(s) dictates which type of DFS traversal method we end up using. GeeksforGeeks has a nice post that gives comparisons and examples of what each of these three will look like. Leetcode also has a section to go over Binary Trees and has some problems to write code for each. We’ll go over them briefly.

PreOrder Traversal

Example Tree

Given the above image, Preorder exploration would go in this order:

(Root, Left, Right) : 1 2 4 5 3

Pseudocode and implementation

Let’s say you want to output the order in which the tree gets traversed. You could do the following:

  1. Create an array to hold all the node values
  2. Create a helper function that accepts a node
    1. If the node is not null
      1. Push the result to the array
      2. Call the helper function for the left side of the tree
      3. Call the helper function for the right side of the tree
  3. Call the helper function and pass the root node as its argument
  4. Return the result
var preorderTraversal = function(root) {
    let result = []
    preorder(root)
    
    function preorder(root){
        if(root){
            result.push(root.val)
            preorder(root.left)
            preorder(root.right)
        }
        
    }
    return result
};

See the recursion in action? The function preorder is calling itself within the function body. Remember the idea of the call stack and the ‘unwinding’ execution order of a recursive function. Let’s say in the above example with the numbers, we start with the root node with a value of 1, push the value to the array, and then call the preorder function with the left child of the root. The function call to the right node will be called later. The process starts all over again by pushing 2, check its own left child, and adding 4. With no more leftward nodes, it’ll start to backpedal by checking the right child node of 2, which is 5, add that value to the array, go unwind again, and then go back to our original calls to the root node, finishing off with checking the right side of our tree. I hope you can visualize it through these words! It can get pretty difficult.

If you can get this, then you can get PostOrder and InOrder traversal.

PostOrder Traversal

Given the above numerical example, postorder traversal would look something like this:

(Left, Right, Root) : 4 5 2 3 1

Implementation
var postorderTraversal = function(root) {
    let result = []
    poTraversal(root)
    
    function poTraversal(node){
        if(node){
            poTraversal(node.left)
            poTraversal(node.right)
            result.push(node.val)
        }
    }
    return result
};

Notice how the function is more or less similar to the PreOrder implementation, but the order of the lines within the helper function is different. Instead of checking the root first, we travel all the way down to the leftward most child, then the right, and push our values, and then push the root.

InOrder Traversal

Finally, given our example, InOrder would go in this order:

(Left, Root, Right) : 4 2 5 1 3

Implementation
var inorderTraversal = function(root) {
    let result = []
    recurInOrder(root)
    
    function recurInOrder(node){
        if(node){
            recurInOrder(node.left)
            result.push(node.val)
            recurInOrder(node.right)
            
        }
    }
    return result
    
};

Again, it’s a subtle change, but we look at the left first, then the root node, and then the right.

Remember, a change in a single line of code can lead to widely different results.

Conclusion

Phew! That’s a lot to digest. It was definitely a lot to take in for me when I was first tackling this subject. Take the time to read this post and all the other things I linked to and then when you’re ready, do some practice problems to test your ability and knowledge of the problem.

Good luck!

Algorithm Concepts – Recursion

Before getting into how to traverse binary trees, whether ordered or unordered, as mentioned in my last post, we have to go into recursion, since it’s an integral part of how to do that, which brings me to the creation of a new series: Algorithm Concepts. This series that’ll show up from time to time will probably cover things like Big O or searching algorithms. On with the show!

Yes. Get over it

So what is this thing?

GeeksforGeeks defines recursion as “the process in which a function calls itself directly or indirectly”. A function that does this, therefore, is called a recursive function.

Say, for instance, you need to figure out the factorial of a given number. Remember your grade school math, ha!) where the factorial of a non-negative integer “n”, is the product positive integers less than or equal to n. For instance, 4-factorial, or 4!, is equal to 4*3*2*1, or 24.

Programmatically, a factorial function could look something like this:

function factorial(x) { 
 if (x === 0)
 {
    return 1;
 }
 return x * factorial(x-1);       
}

Anatomy of a recursive function using factorial

Let’s take a look at the anatomy of this recursive function. Notice the if statement. That would be your base case to terminate the recursive function. If there’s no base case or way to get out of the function, there’s a good chance it’ll just infinitely loop.

Secondly, in the last return statement, notice how factorial() is called again, but with X-1 passed in. It’ll return the value of whatever X is times the return value of factorial(x-1), which in our example, X = 3. It’ll look something like this:

return 4 * factorial(3)

So, before the above statement resolves, there will be a function call of factorial(3). The function call of factorial(3) will then look something like this…

return 3 * factorial(2)

Notice the pattern here? This above statement won’t be resolved either until the next subsequent call finishes. X will get whittled down until the base case is met. This is the part of the function that makes it recursive. factorial() is called within factorial().

We’ll skip the calls of factorial(2) and factorial(1) just for brevity’s sake. When factorial(0) is called, it’ll go to the termination case mentioned earlier and return 1.

Once we hit our base case and there are no more functions to call, things will ‘unravel’, if you will. You can think of this succession of calls as nested functions. The innermost function will return first. Then the next, and then the next. We’ll finally be able to resolve the functions we didn’t finish executing yet.

So in our example, it’ll go as follows:

Since factorial(0) becomes our last function call, it’ll return it’s return value first, and it will return 1.

factorial(1) returns 1 * factorial(0), or 1*1

If you see the pattern, then factorial(2) returns 2 * factorial(1), or 2*1*1

Again, for brevities sake, we can skip factorial(3)’s call, and top off with factorial(4), or 4*3*2*1, which is our last remaining method to complete, and it will return our final value of 24.

When recursion goes wrong

As mentioned before, we need a proper termination case. If we don’t have a proper termination case, the functions will keep going indefinitely until we cancel our program or some sort of error gets thrown. Take the following example:

function factorial(x) { 
 /*if (x === 0)
 {
    return 1;
 }*/
 return x * factorial(x-1);       
}

We don’t have a termination case.

Let’s say in this example:

function factorial(x) { 
 if (x === 0)
 {
    return 1;
 }
 return x * factorial(x);//HERE       
}

On line 6, X is not decremented, so we’ll never reach our base case.

Let’s say in this example:

function factorial(x) { 
 if (x === 0)
 {
    console.log('Sup dude')
 }
 return x * factorial(x);//HERE       
}

The base case isn’t returning anything, so execution won’t stop, which leads to the overall point that in recursion, things are dependent on one another, but there does need some sort of endpoint so that all subsequent method calls can finish. Remember that unwinding idea I was talking about earlier.

Closing

So that’s the deal with recursion, which we’ll see more often when we go back to binary trees next time.

Discovering Data Structures – Binary Tree Implementation

Split that branch in two!

In my last post, we talked about the binary search tree, what it is, and it’s use cases. Now, we’re going to talk about implementation. Since I’ve been working in JavaScript as of late, we’re going to use JavaScript to code it. Here. We. Go.

Implementation of the base classes

There are two main classes for the Binary search tree, and that’s the Tree class and the node class, similar to the linked list class.

Tree class:

class BinarySearchTree{
     constructor(){
          this.root = null
     }
}

Node class:

class Node{
     constructor(value){
          this.value = value;
          this.left = null;
          this.right = null
     }
}

The tree class itself is pretty simple. It just has a root value that points to the root node (recall the upside-down tree). Nodes are a little bit heftier. Not only does it have a value property, but also properties that point to its children.

Insertion and Searching

Let’s take the following BST as an example:

Notice that our root is 15. Recall that everything left of a node has a value less than it’s parent, and everything on the right has a value larger than its parent. With this in mind, we can think through an insertion method. Let’s say we want to insert the value of 9 into this tree. First, first, the tree will check it against its root, 15. Since the value to be inserted is less than 15, well go left. Next, we’ll check it against 6, and go right. Finally, we check it against 7 and go right. Since we have nowhere else to go, we found our insertion point. The gif below demonstrates this process.

Insertion code

//snippet within BST class
insert(value){
     let newNode = new NodeValue(value)
     if(this.root === null){
          this.root = newNode;
          return this;
     }
     else {
          let current = this.root
          while(true){
               if(value === current.value) break; 
               //what you do if there's a value that exists already 
               //is entirely up to you
               if(value < current.value){
                    if(current.left === null){
                         current.left = newNode;
                         return this;
                    } 
                    else {
                         current = current.left
                    }
               }
               else if(value > current.value){
                    if(current.right === null){
                         current.right = newNode;
                         return this;
                    } 
                    else {
                         current = current.right
                    }
               }
          }
     }
}

Searching

For a BST, searching has relatively the same principals as inserting, but instead of inserting a node, we’re just checking for values. Since we’re using a BST, we’re assuming the tree structure has low values on the left, and high values on the right. We can use the same traversal logic for insertion for searching. If we reach the end of a branch but end up coming short, that means the node does not exist in the tree.

Searching Code

//snippet within BST class
search(value){
     if(this.root === null){
          return false
     }
     else {
          let current = this.root
          let found = false
          while(current && !found){
               if(value < current.value){
                    current = current.left
               }
               else if(value > current.value){
                    current = current.right
               }
               else{
                    return true
               }
          }
     }
     return false
}

So that’s searching and inserting in a Binary Search Tree.

BUT NICK. You may ask. What if the nodes are unordered. What then??

Well, I’m glad you asked! But first, we’re going to take a little detour….into RECURSION. Tune in next time!

Discovering Data Structures – Binary (Search) Trees

‘Cause they’re splitting in two! Get it…? I’ll be leaving now.

You know, you’d think I’d be taking a break on data structures and talk about other things like JavaScript, Ruby or anything less computer science-esque related.

Woo!

I was going down that road too, but after encountering the topic of trees on a recent code challenge, I took it as an opportunity to learn about the ins and outs of it for next time I encounter it.

So what exactly are trees?

Trees are a little bit more complex than a linked list. Remember that linked lists are linear structures, with nodes pointing only to their immediate neighbor. The concept of nodes having a pointer that points to the next node gets carried over to binary trees, albeit a bit modified.

So to start off, a tree is a structure that consists of nodes in a parent/child relationship. So from one node, we can have it connect to another node or many nodes, be it 2 or 10 or whatever number. Each connection is then considered a “branch”, hence the name of tree. Try to visualize an actual tree:

Notice where the tree diverges and splits up. Visually speaking, those would be points where the nodes exist. Now for a more typical visual representation of a tree data structure:

Think of it as a tree, flipped upside down. The ‘2’ at the top would be like the trunk, or “root”. Its children would be the nodes that consist of ‘7’ and ‘5’. The ‘2’ node object would have pointers to those children, so think of those pointers as the ‘branches’. As you go down, the ‘7’ and ‘5’ nodes start to branch off and have their own respective children. Finally, it’s possible that those children have their own children. And so we go. Unlike linked lists, there can be multiple paths to an endpoint.

Some other details:

  1. Child nodes can’t point to parent nodes.
  2. Child nodes with the same parent are referred to as ‘siblings’. Remember the child/parent relationship analogy? In a tree, sibling nodes can’t point to each other. That would make the tree into a graph, which I’ll write about someday in the future.
  3. Nodes with no children are referred to as leaves.
  4. The proper terminology for a connection between one node and another is ‘edge’.
Not exactly parent/child, but you probably get the idea

Keep in mind that in a lot of examples, you’ll see numbers stored in these nodes, but the value of the node can pretty much be anything.

Use cases

Trees are used all the time, whether we realize it or not. A common example used is the HTML Document Object Model, or DOM. If you know your HTML web page structure, a web page starts at the HTML root, and then it’s children could be tags like head or body. From the body tag comes a slew of children, like the p tags, ul tags, divs, etc.

File systems can also be thought of as a tree. If you use a windows machine, you can think of the C:/ drive as the root and its folders as its children. Each folder could have its own files and subdirectories.

If you’ve played old point and click adventures, like “Secret of Monkey Island”, or even modern games like “Mass Effect”, you could affect various parts of the plot and your character progression through decision trees. You do one action, result A happens. Do another, and result B could happen. Although it’s not apparent, trees are everywhere.

So. Binary trees.

Right! There are many tree types out there with their own little unique features. If you know your Latin, ‘bi’ means two. So in a binary tree, nodes can have up to two children. So, no children, one child, or two children. No more than that.

And a binary search tree?

It’s a special version of the binary tree that is kept in a specific order. BST’s have data that can be compared, be it strings or numbers or whatever can be comparable. For each node, all data that are less than the node is left of the node, and all data larger than the node is on the right side. You can repeat it for each child node.

200px-Binary_search_tree.svg

Let’s say in the example above in the root node of ‘8’, all child nodes left of ‘8’ have values less than 8, while all values right of ‘8’ have values greater than 8. As we go down the tree, taking ‘3’ as an example, all nodes left of ‘3’ have values less than 3, while all values greater than ‘3’ are on the right side, while at the same time still being less than 8 since it’s still on the left of 8.

To sum up, in a BST, all data is organized in a particular order.

Next time.

We’re going to talk about implementation. See you next time!

Discovering Data Structures and Algorithms – D-D-D-DOUBLY LINKED LISTS

Sorry friends, it’s not time to duel. It’s time to talk about doubly-linked lists

In what would probably be my last post on the subject of linked lists, we’re going to be talking about doubly linked lists, which is a variant of the singly-linked lists.

Seeing double

Let’s refresh our memories as to what a singly linked list looks like:

Recall in my previous posts that a singly linked list goes one way. Each node object will point to the next node until there are no more nodes to point to. If one wants to traverse through a linked list, they’ll have to loop through each node, having a pointer point to the current node. The loop will break once the pointer is not truthy. At the end of an iteration of the loop, the code must have the current node pointer be set to the current nodes “next” value (also referred to node.next).

Now let’s look at a visual representation of a doubly linked list.

Notice the key difference between a singly linked list and a doubly linked list. Each node now has an extra value that points to its previous node on top of the value that points to the next node. Pretty neat.

Implementation

An implementation of a node object would look something like this:

class DoublyLinkedListNode {
    constructor(data) {
        this.data = data;
        this.next = null;
        this.previous = null;
    }
}

Traversal from beginning to end would be the same as it normally would with a singly linked list:

let current = head;

while (current !== null) {
    //your code
    current = current.next;
}

However, we now have a new little feature given our extra pointer to the previous node. We can traverse backward if we have a given node like so:

let current = tail;

while (current !== null) {
    // your code
    current = current.previous;
}

Adding data to a doubly-linked list is similar to adding data to a singly linked list as well. However, not only do we need to consider what the node.next values should be for the nodes that are affected, but we now have to think about that the node.prev values have to be. Take for instance we want to add a node in between two nodes. We would probably have to do something like the following:

insertAfter(previousNode, data): 
  
        // 1. check if the given previousNode is NULL 
        if(previousNode === null)
            console.log("This node doesn't exist") 
            
        // 2. create new node object and set its value to data value passed in
        newNode = DoublyLinkedListNode(data) 
  
        // 3. Make next of the newly created node as next of the passed in previous node
        newNode.next = previousNode.next
  
        // 4. Make the next of previousNode as the newly created node  
        previousNode.next = newNode 
  
        // 5. Make the previousNode as previous of the newNode 
        newNode.prev = previousNode 
  
        // 6. Have the newNodes nextNode's previous value set to the newly created Node
        if(newNode.next !== null) 
            newNode.next.prev = newNode 

Lots of reassigning values between nodes. The addition of the pointer to previous nodes adds an interesting wrinkle. On the one hand, now we have the ability to traverse backward as well as forward. Tracking previous nodes is now handled by the node itself. For singly-linked lists, we would need to set aside space for a pointer that would keep track of the previous nodes as we iterate through nodes to do insertions or deletions.

However, with the addition of a previous pointer within a doubly-linked list, we need to do some more maintaining of what nodes point to what. We need to do a few more operations to set node.prev accurately.

So not all is well in the world of more connections. Perhaps you do need to keep things simple when picking a data structure to use.

In any event, this will be the last post on linked lists as we move on to more data structures.

Discovering Data Structures – Linked List Traversal and a LeetCode problem

I was doing a problem on LeetCode the other day that had the following problem:

Given a sorted linked list, delete all duplicates such that each element appear only once.

An example input gave the following:

Input: 1->1->2->3->3
Output: 1->2->3

Channeling Dave Chapelle like my last Linked List post, my mind went like…

Like Dylan, I definitely spit hot fire

But thanks to the wonders of the internet, all this information of what linked lists are and how to handle them is at my fingertips

A refresher on the structure of linked lists

In my last post about linked lists, I described them as a linear data structure that is a little bit different from arrays. If you recall, here’s a visual representation of a linked list.

If this data structure were an array and I wanted to get to C, it’d be pretty simple by just typing arr[2] and that’s it. However, linked lists do not allow random access. If you want to get to element C in a linked list, you’ll have to start at the head and make your way down.

Traversing the Linked list

Recall what the constructor of a node in a list looks like:

 class Node { 
	// constructor 
	constructor(element) 
	{ 
		this.element = element; 
		this.next = null
	} 
} 

and that the code for a linked list, which holds the head of the list, and the size, or number of nodes, of the list

// linkedlist class 
class LinkedList { 
	constructor() 
	{ 
		this.head = null; 
		this.size = 0; 
	} 
} 

A simple traversal without doing much would look something like this:

//traversal code snippet
let current = this.head; //this assumes that a snippet like this would be within a function that's in the LinkedList class
while(current != null){
    // do what you need to do here assuming the function that this loop is in does more
    current = current.next
}

In the snippet above, we have a variable, current, that is equal to the LinkedList’s head. The head variable could be null, or it could point to a node object. Once it enters the while loop, it’ll check if current is null or not, and assuming that it’s not, it’ll set current to the next node that current is pointing to.

You’ll know that you’re at the tail of a list if the last node on a list points to nothing as its next element. Once we’re at the tail, the loop will terminate.

Now about that LeetCode problem

Now, back to the LeetCode problem. Recall that we’re trying to remove duplicates. We know the limitations of a linked list. We don’t have random access capabilities like an array. What do we do?

The problem supplies us with the following starter code:

var deleteDuplicates = function(head) {
    
};

The function, deleteDuplicates, takes in a head argument. And that’s about it. So what next?

let node = head
if(node){
    // what's next...
    while(node.next !== null){
        if(node.val === node.next.val)
            node.next = node.next.next
        else
            node = node.next
    }
}
return head

First, lets set head to a variable node and check to see if it’s null. There may be cases where we’ll get a null head and nothings actually in this list. We can simply do that by checking for truthiness for null. Recall that a null value is considered falsy.

let node = head
if(node){
    while(node.next !== null){
        if(node.val === node.next.val)
            node.next = node.next.next
        else
            node = node.next
    }
}
return head

Much like in the example in the section above, we need to use a while loop to do some traversal. We don’t really know how big this linked list unless we have access to the actual linked list object that holds the head and count value. A for loop is not a great iterator in this case.

Since this problem indicates that the list is already sorted (how fortunate!), we just need to do a few things:

  1. If the value of the current node, let’s call it NC, that we’re traversing though is equal to the value of the node that the current node is pointing to (node.next, or NN), then we have the current node’s next value point to not the next node, but the node after the next. In the next iteration of the loop, well evaluate the value of the current node to the new node that it’s pointing to.
  2. Otherwise, have current be the next node

We’ll keep doing until the node.next value is null, meaning we’re at the end.

Discovering Data Structures – Objects in JavaScript

According to the Mozilla developer page for objects, they define objects as the following:

The Object class represents one of JavaScript’s data types. It is used to store various keyed collections and more complex entities. Objects can be created using the Object() constructor or the object initializer / literal syntax.

Source

Objects differ from the other (primitive) datatypes of JavaScript(Number, String, Boolean, null, undefined, and symbol) in the sense that it’s more complex. The aforementioned data types store single values, while objects can contain many combinations of these primitive data types.

GET THE JOKE? You tell ’em, Mr. Morris.

Let’s use the following object as an example to explain some key features of the Object.

let dog = {
     name: 'Ein',
     breed: 'Pembroke Welsh Corgi',
     status: 'Genius'
}

In the example above, things like name, breed, and status, or as well define them now as ‘keys’, point to values of ‘Ein’, ‘Pembroke Welsh Corgi’, and ‘Genius’, respectively. Properties of an object is a combination of these ‘key: value’ pairs. In this case, the dog object has three properties. One other thing to note is that keys can be either strings or numbers.

I hope you get the reference!

An object can also have a function as it’s member, so it’ll be referred to as an object’s method.

let dog = {
     //properties from above example 
     //new snippet below:
     bark: function(){
          console.log(`${dog.name} spoke!`)
     }
}

Calling dog.bark would print the console ‘Ein spoke!’. It works with the object’s data that is stored in its properties.

Ways to create objects

1. Object literal

The example with Ein above would be the object literal syntax to initialize an object and it’s properties directly.

2. Object Constructor

Let’s say in the example below, instead of using the object literal syntax, we use the ‘new’ keyword.

let dog = new Object();
dog.name = 'Ein'
dog.breed = 'Pembroke Welsh Corgi'
dog.status = 'Genius'

3. Constructors via Object-Oriented Programming methods

ES6 introduced the more traditional way of defining objects the way other programming languages (like Java or Ruby) do. Keep in mind that while the original javascript wasn’t built for OOP, over time, especially now more than ever due to high usage, it supports it.

class Dog {
    constructor(name, breed, status) {
        this.name = name;
        this.breed = breed;
        this.status = status
    }
}

let dog1 = new Dog('Ein', 'Pembroke Welsh Corgi', 'Genius')

console.log(dog1.name) //Prints out 'Ein'

Ways to access info from objects

1. Dot notation

//using constructor object as example:
dog1.name //'Ein'
dog1.breed //'Pembroke Welsh Corgi'

2. Bracket Notation

//also using constructor object as example:
 dog1[name] //'Ein'
 dog1[breed] //'Pembroke Welsh Corgi'

Keep in mind, a number can be a key for an object. If you want to access a value that has a number key, you need bracket notation to access it.

Use Cases

Objects are useful for storing relations between strings and data. With the dog examples above, we are able to store a lot of data that are related together in one place. One practical way to use them is through lookup tables or dictionaries. Think of the game Scrabble. Each letter has its own point value. Common letters, like A, E, or R, are worth one point. Other letters, like the dastardly Q, are worth 10. You can think of it like this:

let scrabbleLetters = {
     'A': 1,
     'B': 3
     //so on and so forth
}