Discovering Data Structures – Linked Lists

As I’m preparing for different code challenges, I’m coming across different concepts that fall under the umbrella of Data Structures and Algorithms. For instance, I’m going through different questions on HackerRank and LeetCode, and come across certain questions that have us traverse through a LinkedList.

I didn’t learn that in boot camp

I’m going to be completely honest, it took me a while to remember what that was. I took a programming class in college many years ago and I remember the term but had to look it up to refresh my memory on the details. Before I get into what linked lists are, let’s talk about what data structures are.

Data Structures briefly explained

Yeah, good luck explaining this in brief.

Wikipedia describes it as a data organization, management, and storage format that enables efficient access and modification. In other terms, it’s a collection of data values that have relationships with each other in some way. This data can be manipulated in some way through methods or operations. If you’re thinking arrays, you may have heard some such as push(), pop() or shift(), to name a few. Other operations may not be abstracted as clearly, depending on the language you’re using, such as inserting, deleting or sorting.

Now, on to linked lists

Linked lists is a linear data structure, consisting of nodes between a head node and a tail node. Each node stores a data value and has a reference pointer to the next node, and in the case of a doubly-linked list, has a pointer to the previous node as well.

A singly linked list.

They’re often compared to arrays, which is also a linear data structure. However, they’re different in the sense that the data stored in a linked list is not stored contiguously in memory, or in other words, next to each other.

What this means is, say for example I want to get rid of node “C” in the picture above and have node “B” point to “D” instead. What I would do is before deleting node “C”, I would have node “B”‘s next pointer set to the value of node “C”‘s next pointer, which in this case is to “D”. I didn’t have to do any other memory allocation or shifting of the other elements.

This is the advantage of linked lists. Let’s say I deleted an element in an array. That means I would have to shift a bunch of memory around to shift all the elements.

Some disadvantages

Now, like all data structures, they all serve their purposes and have both advantages and disadvantages. Unlike arrays, random access is not allowed. If I wanted to get information from a list, I’d have to traverse through the list sequentially. Therefore, some search algorithms are slower or not available to the linked list.

Implementation in JavaScript

As of late, I’ve been programming almost exclusively in JavaScript to simplify some of my learning experiences. Jumping around languages got confusing. That’s not to say I won’t touch Python again, but it’s going on a short hiatus.

Some languages, like Java, C++ or Python, have built-in classes for linked lists. Javascript does not!

This article from GeeksForGeeks, which was referenced in my last post, has been a big help in understanding how to implement the different classes and functions needed for linked lists to work. For instance, a node class would look something like this:

 class Node { 
	// constructor 
	constructor(element) 
	{ 
		this.element = element; 
		this.next = null
	} 
} 

Since a LinkedList is comprised of nodes, then a LinkedList class would look something like this:

// linkedlist class 
class LinkedList { 
	constructor() 
	{ 
		this.head = null; 
		this.size = 0; 
	} 
} 

In the code snippet above, we’re assuming that it’s an empty list, so the head is at first null, and the size of this list is first set to zero. Subsequent helper methods like add or delete would alter the value of this object property accordingly.

I encourage you to explore the article I linked and keep programming and exploring other data structure types. Tune in next time!

Rails and Django, a comparison

Continuing where I left off last time comparing Ruby and Python, I’m going to continue this small series by talking about the comparisons between two commonly used frameworks for each of these languages: Ruby on Rails, and Django for python.

It’s not a fight, just a comparison!

First, some similarities

Both are open-source frameworks used for the development of applications and for the most part, have a lot of similarities.

1. Architecture

Both use the MVC (model-view-controller) web application architectural design. One little, but important, detail for Django is that it replaces the word Controller with Template, making it MVT.

As a refresher, the MVC or MVT architectural pattern that divides an application into three parts: the model, the view and the controller, or template, depending on the framework. It separates data models from business logic(controllers/templates) and visual representations.

2. Community Support

It’s 2020, so these frameworks have been out for quite some time (about over a decade for each). Since then, the usage of both has grown considerably. Major companies that use Django include Spotify, Youtube and Instagram. Well known companies that use Rails include Github, AirBnB and Shopify. In both cases, both frameworks are very mature, and have lots of plugins and packages for Django and lots of Gems for rails. There’s not much need to reinvent the wheel when developing for both.

And now, some differences

Quite a lot actually, John Mulaney

It’s all about the languages

In my last post about Python and Ruby themselves, I explained how there were different philosophies that dictated how the languages were designed, which in turn, influenced how they are used. These philosophical differences are expressed through the frameworks as well.

The thought behind python development is that there should be one solution and one solution only to a problem. While in practice that doesn’t work out that way sometimes, for the most part, it holds true. That means debugging isn’t going to be too hard.

On the other hand, because Ruby is so expressive and because there are multiple ways to solve a problem, it can seem sometimes Rails is magic and that it’s not entirely clear where the source of your woes may be.

Now, that’s not a knock on Rails per se. It’s super SUPER easy to get a rails app up and running (I’d say 15 minutes roughly). There are lots of assumed pre configurations, which speeds up the development process. Django, in my experiences so far, on the other hand, requires a bunch of code upfront to set up. Depending on who you ask, some people want that control and flexibility, while others want something done quickly.

However, I do have to say, because there are so many assumed configurations in rails unless you’re familiar with the naming conventions, it may get tricky keeping track of how the conventions go. For instance, the naming convention for models is singular, but views and controllers are plural (Car vs Cars for example).

Conclusion

So how does one go about picking a framework? It seems to come down to comfort with the framework and the language. As you can see, both can be used to achieve the same goals, but there are pros and cons to both. Do you prefer a convention-over-configuration approach ala Rails, or want something with more control and explicit in Django?

Something also to consider are business needs and long term planning. Maybe you need to get something up and running quickly for an MVP. Perhaps Rails is the answer. What about something to do with machine-learning or fine-tuned customization? Django might be the answer.

Either way, consider your needs. You can’t go wrong with both.

Finally, I just want to say, with what’s going on with the Coronavirus, I hope all of you stay safe and healthy! Be mindful of those around you. be alert, not anxious and think about how we can get through this together, with your friends, family or community.

Brushing up on programming Fundamentals

Coding boot camp offers many opportunities to grow quickly as a coder and have many projects under our belt. They also give us problem-solving skills to recognize patterns when we come across languages or frameworks that we’re not too familiar with. With all the upside, one thing that I’ve been having to confront lately is the challenge of tackling traditional computer science questions in either HackerRank challenges or technical interviews.

These types of concepts were definitely covered in boot camp, but to have those concepts truly sink in and be understood takes time. There’s only so much one can learn in a span of 15 weeks. With that said, here are some things that have been helping me get comfortable with the fundamentals of computer science and programming.

Doing readings and coding along with them

It’s like preparing for an exam

Prepping for coding challenges is like prepping for an exam. Sometimes I just have to read about concepts, execute them in code snippets on Repl.it, and see if I get the concept or not. Cracking the Coding Interview is more or less the gold standard for this kind of work. It goes into great depth into some of the topics covered in coding challenges and offers problems to solve. Some of the topics include Stacks and Queues, Big O notation, and Trees and Graphs.

GeeksForGeeks

GeeksForGeeks is a giant repository of programming knowledge. Not only does it have explanations of coding problems, but they also provide information on programming languages, concepts, design patterns and so much more. Be sure to check it out.

Drill, drill, drill

Sometimes this is what it feels like

After reading and studying, sometimes we just have to put our new-found knowledge to the test in the form of coding problems found on sites like HackerRank or Leetcode.

Sites like these offer problems to solve. They can be sorted by difficulty. You can write any code you desire to solve the problem and offer and test cases. These systems provide many languages to code in. After finishing, you can submit your code to have it evaluated against hidden test cases and for efficiency.

One thing that I’ve found helpful on sites like these is the discussion section, where people offer up their solutions. I can see what other people have done and compare their solutions to mine to see where I can improve and why.

Challenge each other in person and be open to being challenged

It can get comfortable just coding on the laptop and drill all day, but sometimes there will be times where you’ll have to code in person. Talk about nerve-wracking! However, the more you code in person, think out loud, and explain your thought process, the easier it can get. Grab your peers. Ask each other questions! If you have friends in the industry, see if they’re willing to have a whiteboarding session with you. These kinds of interactions give you a safe environment to practice.

Finally, a note on health

These challenges can be stressful, especially those coming out of a boot camp program. It’s very important to get some exercise and take breaks to recharge before another day of training. I often compare coding training to actual weightlifting training. When I was new to it, I would over train and not let my body rest after working out. It would hurt my workout sessions for the future. The same applies to coding training. Do some drills and keep practicing, but be sure to take breaks and rest before an interview.

I say this often to myself, but try not to be hard on yourself as well! With practice and perseverance, things will go well.

Good luck!

Moving from Ruby to Python, first impressions

Since graduating from Flatiron School, I’ve been in this state of “choose your adventure” mode. It’s been up to me to decide what projects I want to work on, so I opted to learn a new language: Python.

An accurate representation

So why Python?

The decision to learn python was mostly a career move. Many companies use it. It’s versatile. It helps to learn another popular language. It’s also easy to pick up. There are a lot of upsides, so why not? That said, it’s still weird transitioning from languages that I used frequently during boot camp (Javascript and Ruby), so there’s still an adjustment period.

I’m also making my way to utilizing Python as the backend language in the stack, so eventually, you’ll see posts about Django and Flash in the future.

Similarities and differences between the two languages I’ve noticed thus far

Before I start, I want to preface my blog by saying that spent a lot of my time in boot camp (15 weeks) using ruby in some capacity. Also, I was focused on learning to code exclusively. Comparatively, I’ve only spent a month working in python (not to mention job hunting and other responsibilities on top of that) so my bias is going to show. At the same time, it’s been fun trying to translate what I could do with Ruby into and see how I could do the same with Python.

Similarities thus far

  • Both languages are dynamically typed, meaning that I can use a variable without declaring it first. How convenient!
  • Both support object-oriented programming.
  • Both use brackets ( ‘[ ]’ ) for lists, and curly braces ( ‘{ }’ ) for dictionaries (or hashes, as they call in ruby)

But, oh so many differences

Philosophies of the languages

One huge difference that I’m coming across has to do with the differing “design” philosophies of the languages. One thing that I’ve come to appreciate with the Ruby language is its flexibility. There are many solutions to a problem. With that flexibility comes a critique when it comes to debugging. Programmers would potentially have to pour through code to see what the issue truly is.

On the flip side, Python leans toward having simplicity. There should be one right answer to a problem. Less guesswork, but less flexibility. That’s not to say I don’t like it. No language is perfect. Just like tools, different languages serve different needs.

Code Blocks

Python uses white space to determine when code blocks begin and end. Ruby uses “def” and “end”. Getting used to the white space portion has been one of the bigger things to get used to.

Varying degrees of truthiness

Python’s boolean values are ‘True’ and ‘False’ (capital) while Ruby’s is ‘true’ and ‘false’.

In Ruby only false and nil are falsey. Everything else is truthy (yes, even 0 is truthy). In Python, 0, empty arrays, strings, and hashes all count as false.

Yeah, right there with you

Conclusion

My coding journey is still in its infancy. I still have lots to learn and I’m embracing all of it. As the journey continues, I’ll key you in as I wade through more python projects.

See you then!

Life at Flatiron School – What the heck are arrow functions?

With vanilla javascript, we would typically declare functions with the following syntax:

const myFunction = function(params1, params2, etc..){
     //do something here
}

Pretty straight forward, wouldn’t you say?

Then comes along the arrow function, or whatever you want to call it. Some have called it rocket arrow, while one site I came across called it the fat arrow.

The arrow function syntax was introduced in ES6 in hopes of making writing syntax for functions simpler and cleaner. A version of the function above using arrow functions would look something like this:

const myFunction = (params1, params2, etc...) => //do that thing you do

For simple functions, it may not make a difference, but as the functions grow larger, it might!

Some other details about arrow function syntax

Arrow functions without parameters can be written like so:

() => { /* do something here */ }

When there’s only one parameter to pass, opening parenthesis are optional:

paramaters => { /* JUST DO IT */ }
(paramaters) => { /* SPONSORED BY NIKE */ } //effectively the same thing as above

If your function is returning an object literal, be sure to wrap it in parenthesis:

/* No bueno. It'll think it's a regular function body */
(name, description) => {name: name, description: description};

/* That's better */
(name, description) => ({name: name, description: description});

This…again

‘Cause..arrow…functions…

One other thing that arrow functions have is it’s own ‘this’. Instead, by using an arrow function, the ‘this’ is bound to wherever the function is defined. Using React as an example, let’s say we have a button within a component that has a function that changes the background color, but the function has regular syntax and not arrow syntax.

/* Within the render method */
return (
      <button onClick={this.handleClick} style={this.state}>
        Set background to red
      </button>
    )

/* function written normally * /
 handleClick() {
    this.setState({ backgroundColor: 'red' })
  }

Written this way, the ‘this’ within handleClick function would be null. Had handleClick() been written as an arrow function, like so:

handleClick = () => {
    this.setState({ backgroundColor: 'red' })
  }

then ‘this’ would be hard-wired refer to the location at which the function was defined, in this case, the class component that the function is within.

Confusing, I know. However, using arrow functions does save some guesswork when it comes to figuring out ‘this’ bugs and following the trails of callback methods.

Thanks for reading my article. Hope you like it!

Life at Flatiron School – Common Events in JavaScript

JavaScript interaction with HTML is handled through events. Events happen when either the user or the browser manipulates the page in some way. We can use these events to do whatever our imagination allows, from sending alerts, validating data, or perhaps shooting fireworks from our webpage.

DO THE EVENT

In this post, we’re going to talk about some common events that occur with websites, but first…

Some notes on Event Listeners

An event kicks off whenever an action occurs on a page that JavaScript can react to, such as when a user clicks on a button (click event) or presses a key (keypress event).

When we attach an event listener to an HTML element, the element now has the ability to “listen” for a given event to fire.

SAY WHAT AGAIN

Say for example we want the text color of an <li> element to change and shoot fireworks when the user clicks on it. We could use the following code:

liElement.addEventListener('click', function(e){
     e.target.style.color = "red"
     //DO IT NOW
     shootFireWorks()
})

In the code above, we’ve attached an event listener to our <li> element with a first argument ‘click’, and a callback function for the second argument. We’ve now given the element the ability to “listen” for a click, and then it’ll do whatever is in the callback function.

Some common events

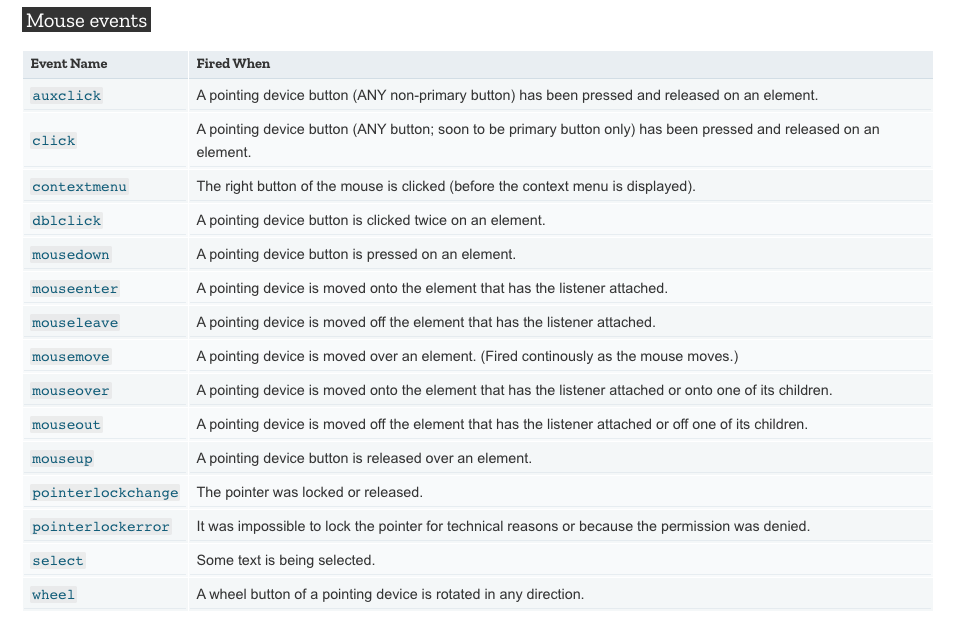
Mouse events

I think it’s easy to say that because we use the mouse to interact with web pages, mouse events are one of the most frequently used events (side note: there are some additional events used for touch-enabled devices). Some examples include:

  • click Event: Occurs when a mouse button is pressed and released on an element
  • dbclick event: Occurs when a mouse button is clicked on twice
  • mouseenter event: Occurs when the mouse pointer enters an element
  • mouseover event: similar to mouseenter, but in addition to the parent, the event occurs when the pointer enters one of its children
  • and so much more…

Form and focus events

The submit and reset events fall under form events. Like their names suggest, the form events fire when buttons of a specific type within a form are clicked on. Focus events occur when an element receives…well, focus.

Think of all the times you’ve filled out a form on the web and when you click in an input field to type in a password, a small effect like a border highlight or background color change occurs. Those effects happen in a callback function when the focus event occurs.

Keyboard events

Keyboard events check for when there’s a usage of a keyboard key press. The events include:

  • keydown event: occurs once when a key is pressed.
  • keyup event: occurs once when a key is released.
  • keypress event: occurs continuously while a key is pressed. (It’s deprecated and recommended that it’s not used anymore)

The difference between keydown and keypress is that keydown acknowledges all keys when they’re pressed, but keypress will not acknowledge keys that do not produce a character, like Alt or shift.

So there you have it! Some common JavaScript events. Happy coding!

Life at Flatiron School – Quick implementation of Bootstrap 4 for Rails

You may have heard some whispers of Bootstrap before here or there when thinking about the visuals of the apps you’re making. What’s this fancy doo-dad that allegedly makes my rails app look better?

Before we get into all that, please make sure you have a decent handle on CSS and HTML. Or maybe you just want to throw caution to the wind and learn via trial by fire.

So what is this thing?

Much like how Rails makes app development for ruby fast and easy(or rather…easier….?), Bootstrap does the same thing for front end development with CSS and javascript. In other words, black magic. It helps in a few things:

  • Makes visuals consistent and uniform
  • Helps visuals be responsive, or in other words, allows for visuals to function regardless of device or screen size

Ok, that sounds cool. How do we put it in rails?

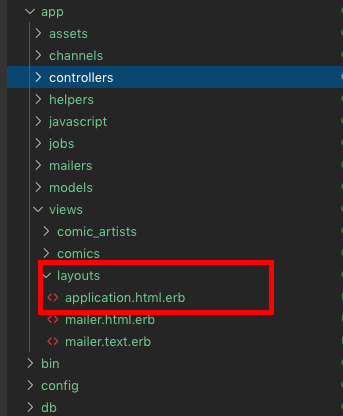
First, let’s talk about a file that gets generated when we make a new rails app called application.html.erb. It’s located within “App” -> “Views” -> “Layouts”

Next, let’s look at what’s generated from the get-go.

What’s generated is an .erb file with an HTML doctype, html tags, head tags, and body tags. If you may recall from prework, we place links to stylesheets here, which will play a big role later. Our content goes within our body tags, so take a look at line 13, with the keyword, yield. What happens with all the Rails magic is that when we make our requests, code from our views, such as an index.html.erb file, will be placed where the yield keyword is. That way we don’t have to paste in links to our stylesheets in every view we make and that styles applied here will be applied everywhere.

Neat, but now what?

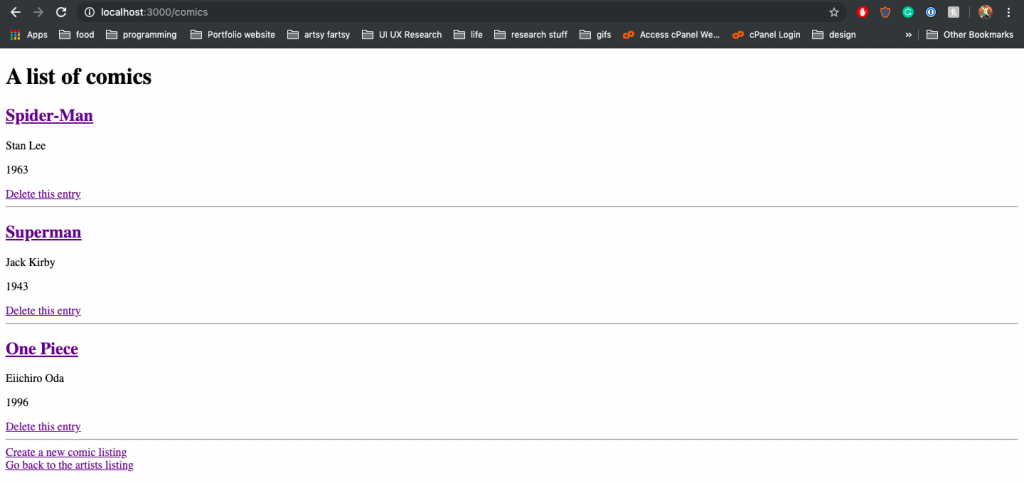
Currently, our apps may look something like this, complete with the stale Times New Roman Font

However, Bootstrap 4(the version currently out) documentation, recommends the following stylesheet link gets pasted between the head tags before all other style sheets to load baseline bootstrap CSS.

<link rel="stylesheet" href="https://stackpath.bootstrapcdn.com/bootstrap/4.3.1/css/bootstrap.min.css" integrity="sha384-ggOyR0iXCbMQv3Xipma34MD+dH/1fQ784/j6cY/iJTQUOhcWr7x9JvoRxT2MZw1T" crossorigin="anonymous">

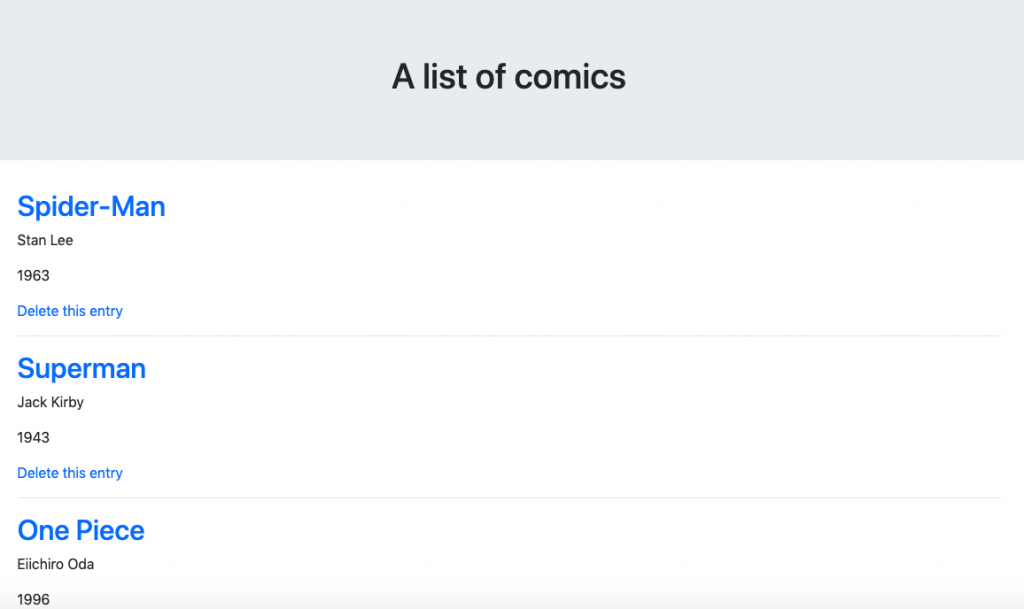
A refresh and you’ll get something like this:

Huh, well look at that.

As simple as it looks, default values does a lot already. But what else can it do?

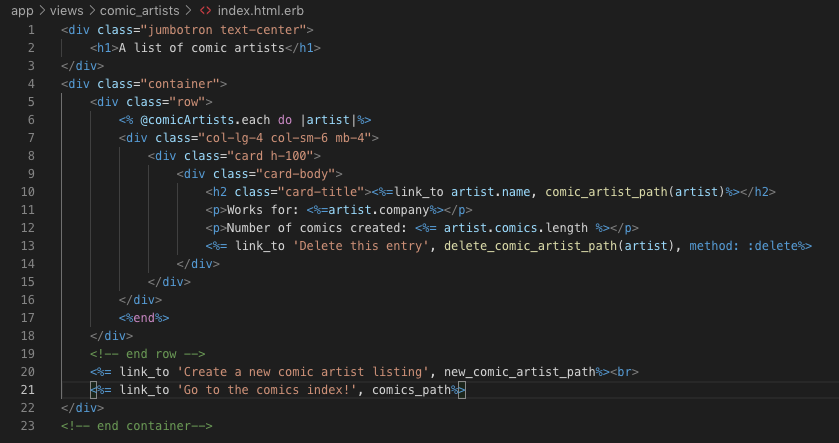
Bootstrap can recognize a bunch of keywords that have to be used within the class attribute of the HTML tags that your elements are placed in. For example, I placed an H1 tag within a “jumbotron” div and the rest of my content within a “container” div, like so.

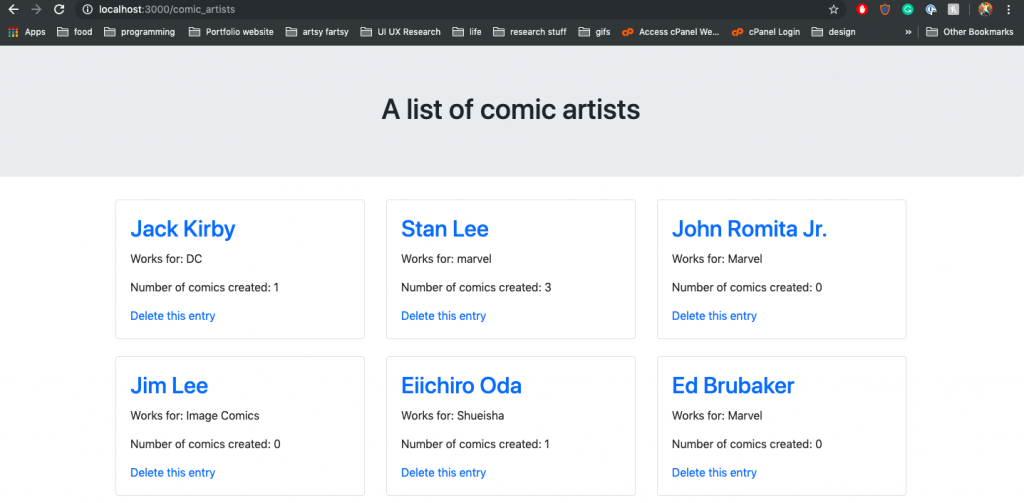
And this is what we get

Something like this…

Makes a bunch of cards

SHIP IT. LET’S GO HOME.

Some closing thoughts

This is just a quick primer. As noted before, get a good handle on HTML and CSS mechanics before jumping right in.

Please please please please pleeeeease read the documentation to get a good grasp of what bootstrap can do and how it can be customized. If you want to use some of the elements that require javascript, there’s some javascript code that needs to be pasted before the closing body tag for it too work.

Another helpful website would be https://startbootstrap.com/, which can give you ideas on how to implement certain layouts or styles. Check it out!

Life at Flatiron School – C.R.A.P Design principles for Web and User Experience

This is the first in a series of blog posts written during my time at Flatiron school. More posts will be added as time goes on!

A little bit about me and why I love design

Prior to joining the Flatiron school to be a software developer, I had some experience in the game industry primarily as a 3D artist. Creating art assets and thinking about the player experience was a big part of my job, so the appreciation for great visuals, how they’re made, and why never really left after my exit.

I was making ALL the pretties

My instruction at Flatiron school is helping me translate those skills quite nicely into software development and it’s giving me a greater understanding of what’s going on under the hood with the applications we use.

So what’s all this about C.R.A.P?

I guess those that work closely with software have a knack for creating acronyms. C.R.U.D. D.R.Y. Some sound nifty, but others, I’m not so sure. It does get the message across! C.R.A.P is a design principle that stands for the following:

  • Contrast
  • Repetition
  • Alignment
  • Proximity

Usage of all four leads to visually appealing sites and applications. Gone are the days of the ’90s where we had pixelated gifs and iFrames.

Remember sites that look like these?

Things have spruced up a bit.

We’ve come a long way, so much that companies are developing their own design systems to ” [build] better and faster; better because a cohesive experience is more easily understood by our users, and faster because it gives us a common language to work with.”[1].

Your product better look pristine, white and clean or else

While developers may not touch a lot of things in the design process, it’s helpful to know the language of designers to understand where they’re coming from and the choices that they make, possibly helping you build out their designs when it’s time to implement them.

Who doesn’t like Weebay?

Let’s go over some examples of each of the four principles.

Contrast

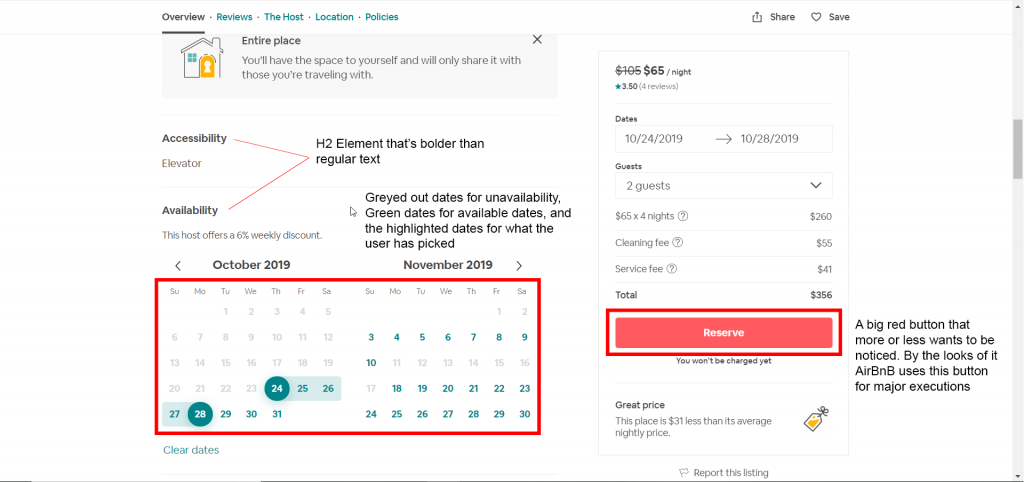
A definition provided by Google is “the state of being strikingly different from something else in juxtaposition or close association.” Another way to put it is to make something stand out from everything else. Sometimes, we want to draw attention to certain elements in our applications and you can do that by utilizing contrast.

Contrast can be established through color, size, font usage, spacing from elements (more on that later). Take a look at a portion of a listing from Airbnb below.

Repetition

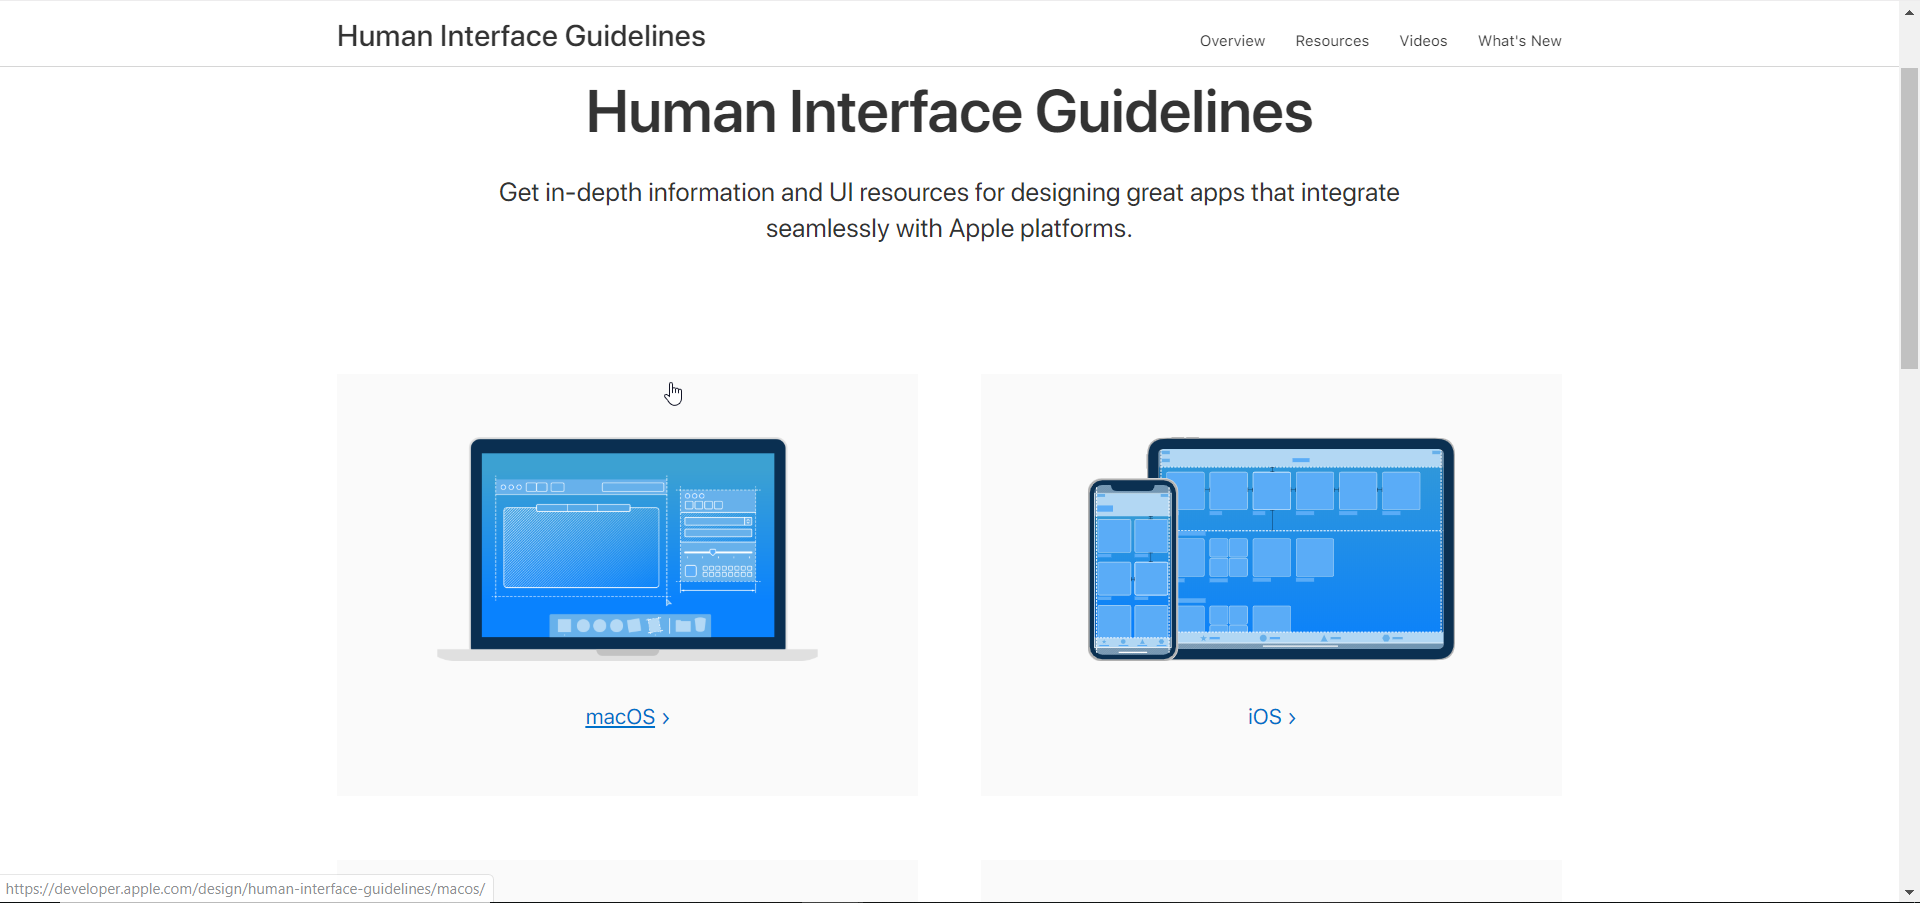
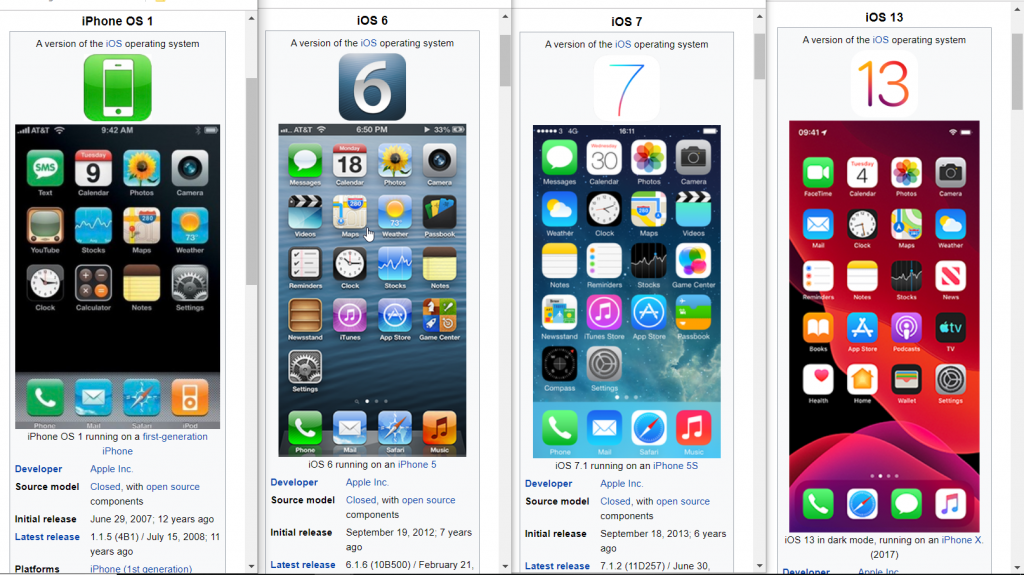
Repetition is a means of establishing consistency and train users to expect certain outcomes as they interact with an application or website. Think about Apple products and their user interfaces for a moment. Even though iOS has gone through incremental changes since its start in 2007, we more or less know how an Apple product behaves and expect it to look and feel a certain way. That, in part, is a conscious choice of being repetitive in their designs for all these years. By using repetition, Apple maintains brand identity, trust and familiarity. Users pretty much know what to expect when getting an iOS product.

Although there have been incremental changes, on the onset, not much has drastically changed

Looking at Airbnb again, we look at the “cards” below that have more or less the same style, and so users can choose what they want based on content more so than contrasting design styles.

Where would I want to say in Tokyo anyway…?

Alignment

Alignment gives a sense of order to a design so that information is readable and coherent.

Side note: I really like DotA 2. Like, really, really, like DotA 2. Patch 7.00 introduced a redesign to the UI which I think serves as a good example of alignment. Below is from Patch 7.22h.

Did I tell you I really like DotA?

The hero portraits are on a neat grid system, with a selected hero and their attributes displayed neatly on the right.

Proximity

The principle of proximity deals with grouping similar objects together and separating those that are different. When one visual element is grouped with a bunch of others, it gives a clue that they’re somehow related. This principle puts an emphasis on organizing data into chunks that are digestible. Let’s look at the DotA UI again.

One of DotA 2’s big UI challenges is trying to organize so much character information on one screen while trying not to make it too cluttered. There are currently 100+ heroes available, each with their own unique attributes and abilities.

Valve made the choice of grouping heroes by their main attribute: strength, agility or intelligence. The headers above each grouping kind of gives a clue that the heroes under the header are that type. For a newbie, unfortunately, that doesn’t mean much, but for those acquainted with the game, it gives an idea of what hero you may want to pick.

For the character card on the right, it’s size and separation from the portraits gives a clue that it serves a different purpose, in this case, character information.

Wrapping Up

This is just a small exploration of the four principles that govern a lot of websites and applications that we interact with on a daily basis. In the context of us as software developers, some questions that we may want to think about could be, “Well, if this is a repeatable element, what combination of methods should I use to not repeat myself in my code?”

In a future post, I’ll explore some tools that could help us implement CRAP efficiently. Also, check out some of the links below for some extra reading materials

Footnotes and Extra Reading

[1]. Saarinen, K. (n.d.). Building a Visual Language. Retrieved from https://airbnb.design/building-a-visual-language/.
Introduction to DotA 2 UI update in Patch 7.00
Apple Human Interface Guidelines